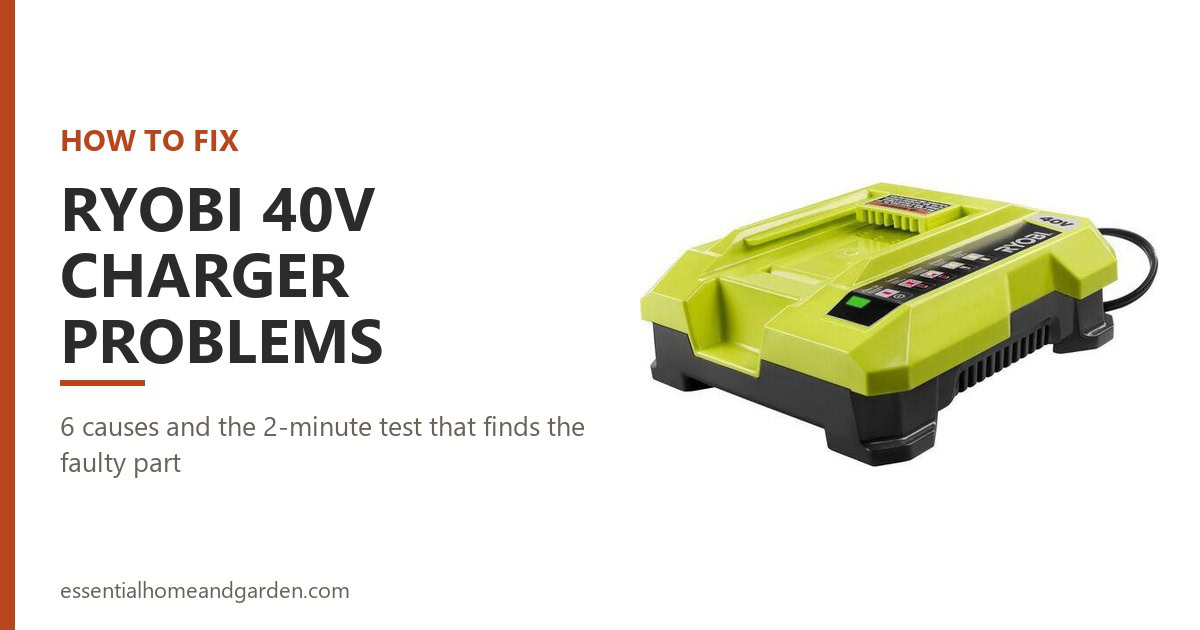
Is your Ryobi 40V charger flashing lights at you, sitting on one steady color forever, or showing nothing at all? Most of the time the charger itself is fine, and what you are looking at is a temperature hold, a dirty contact, or a battery that has reached the end of its life.
The trouble is that a failing charger and a failing battery look almost identical from the outside. Work through the wrong one and you will spend money on a part that was never broken.
This guide covers the OP400, OP401, OP403, OP404 and OP406/OP406A chargers, and the OP4015, OP4026, OP4030, OP4050 and OP40752 battery packs. Every light code and repair step below comes from Ryobi’s own operator manuals, so you can trust what you are reading.
This post contains affiliate links. We may be paid a commission if you purchase through links, at no extra cost to you.
The Important Stuff
- Red and green flashing at the same time is Ryobi’s error state. It means the pack or the charger has faulted, and Ryobi publishes a two-minute test that tells you which.
- The rapid charger and the standard charger use different light codes for the same condition. Check which one you own before you diagnose anything.
- If your charger flashes red and green with no battery inserted, there’s no pack to blame. That points at the charger.
- If none of the lights come on at all, take the pack off and don’t insert another one. Ryobi is explicit about this.
- A pack that shows four green lights and still won’t run your tool is not a charger problem. The fuel gauge measures voltage, not health.
6 Reasons Your Ryobi 40V Charger Isn’t Working & How to Fix It
Use this table to find your symptom, then read on for the full fix.
| Reason your charger isn’t working | Solution |
|---|---|
| 1. Both lights flashing at once | Ryobi’s error state. Run the two-pack test to find out whether the pack or the charger failed. |
| 2. Lights never move on to charging | Your pack is too hot or too cold. Bring it to room temperature and try again. |
| 3. No lights at all | Check the outlet and cord. Remove the pack and do not insert a second one. |
| 4. Dirty contacts, or the pack won’t seat | Unplug, clean the port and terminals, and reseat until the latches snap. |
| 5. Pack too flat for the charger to see | Use a standard charger, which has a documented conditioning mode. Give it hours, not minutes. |
| 6. Says full, but your tool won’t run | Not a charger fault. Your pack is failing under load, or the tool is at fault. |
First, Check Which Charger You Have
This matters more than most guides admit, and getting it wrong sends you down the wrong path immediately.
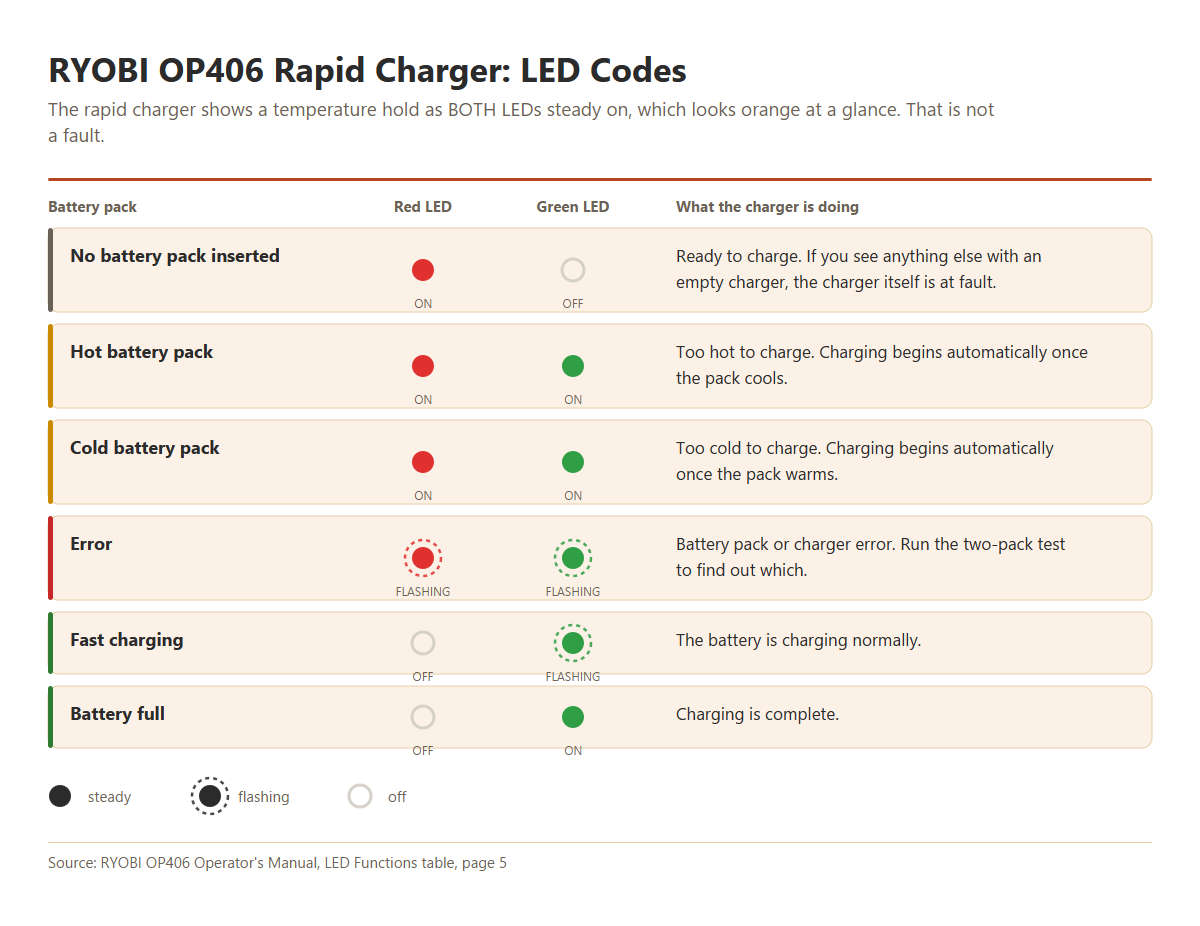
Ryobi’s rapid charger and standard charger use different light codes for the same condition. Look at the model number molded into the housing or printed on the label underneath.
If you own the OP406 or OP406A, that’s the rapid charger. When your pack is too hot or too cold, you’ll see both LEDs on steady, which looks orange or amber at a glance. It isn’t an error.
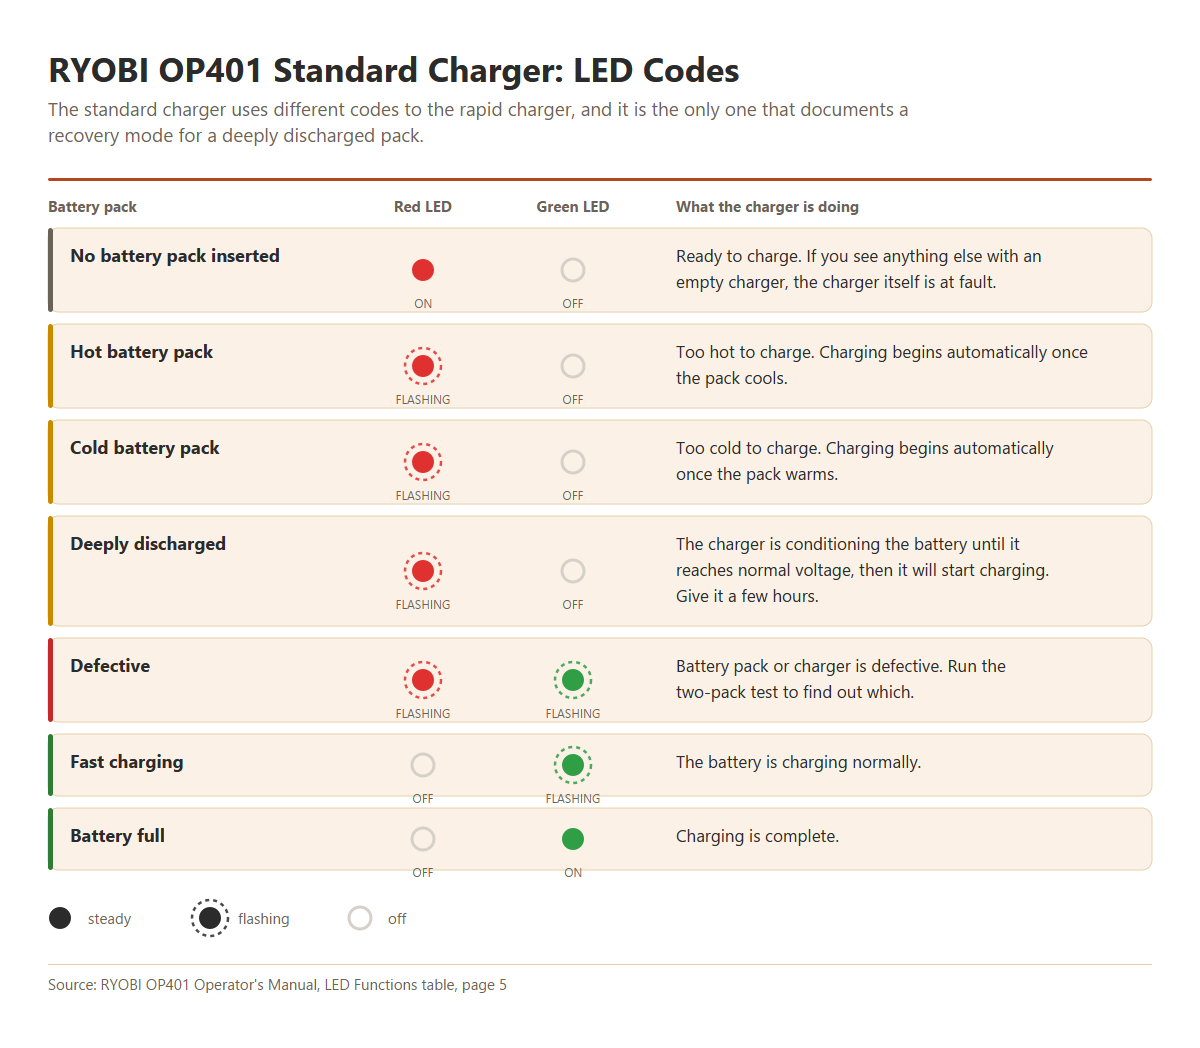
If you own the OP400, OP401, OP403 or OP404, that’s the standard or compact charger. A temperature hold shows as red flashing with green off, and this charger has one extra state the rapid charger doesn’t: a conditioning mode for a deeply discharged pack.
If you read a guide that tells you “red and green means a dead battery” without asking which charger you own, that guide is wrong for about half its readers.
Both chargers agree on one thing. Red and green flashing at the same time is the error state.
1. Both Lights Are Flashing at Once
This is the most common Ryobi 40V charging complaint you’ll find anywhere, and it has a precise meaning.
Ryobi’s OP406 manual calls it “Battery pack or charger error.” The OP401 manual calls it “Battery pack or charger is defective.”
Read that wording carefully. Ryobi isn’t telling you the battery is dead. It’s telling you that one of the two parts has faulted, and it doesn’t yet know which.
If you see this with no battery in the charger at all, you can stop right there. With nothing inserted, every Ryobi 40V charger should show red on and green off, meaning it’s ready. There is no pack present to be at fault, so your charger is the problem.
How To Fix It
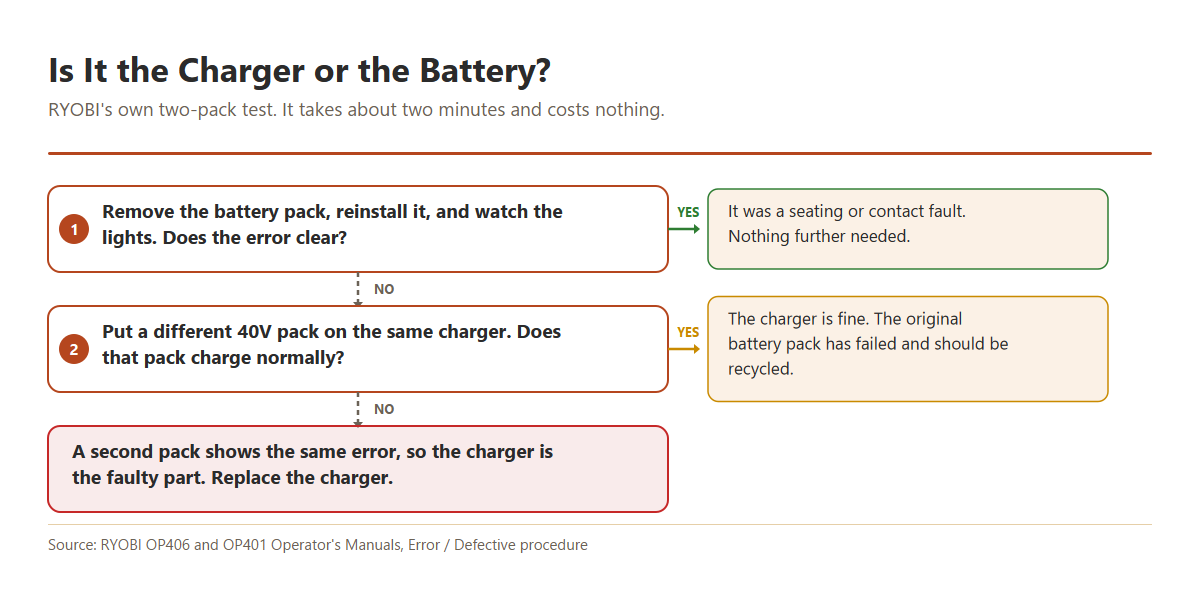
Ryobi publishes a three-step test. Follow it in order, because each step rules something out.
- Take the pack off the charger, put it back on, and watch the lights the second time.
- If the error repeats, put a different 40V pack on the same charger.
- If that second pack charges normally, your original pack is the failed part. Recycle it rather than continuing to cycle it.
- If the second pack shows the same error, your charger is the failed part and needs replacing.
That is the whole diagnosis. It takes about two minutes and costs you nothing.
If the error clears when you reseat the pack, your contacts are dirty rather than the charger being broken. Skip to cause 4.
This is the single most-asked question we get, so there’s a whole guide on it: why your Ryobi battery flashes red and green covers every cause of this one code, including what to do when it flashes with nothing in the charger.
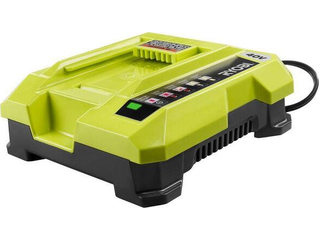
Second pack showed the same error?
That’s your answer. The charger has failed, and no amount of cleaning or waiting will bring it back.
2. The Lights Never Move On to Charging
The charger acknowledges the pack, then seems to do nothing for an hour.
Nothing is flashing in the error pattern. On an OP406 you’ll see both LEDs on steady, and on an OP400 or OP401 you’ll see red flashing with green off.
This is not a fault at all. The charger has measured the pack’s temperature and is refusing to charge until it comes back into a safe range. Lithium cells are damaged by charging outside that window, so the charger is protecting the cells.
How To Fix It
- Bring the pack indoors and leave it off the charger while it settles to room temperature.
- Give a hot pack 30 to 60 minutes. One that just came off a mower on a summer afternoon needs longer than most people expect.
- Put it back on the charger. You’re looking for green flashing, which means it is charging.
The numbers are worth knowing. Ryobi says not to use, store or charge a pack below 50°F or above 100°F. The charger’s own resume thresholds are wider: an OP400 restarts a hot pack once it cools to roughly 120°F (40°C), and a cold one once it warms to roughly 32°F (0°C).
A pack that feels slightly warm on the charger is normal, and Ryobi says so. A pack too hot to hold comfortably is not, so let it cool.
If the charger never leaves this state even at room temperature, its temperature sensing has failed. Treat it as cause 1 and run the two-pack test.
3. Your Charger Has No Lights at All
Nothing lights up, with or without a pack on it. This one carries a safety instruction, so read it before you start swapping parts.
How To Fix It
- Try a different wall outlet you know works. Ryobi specifies normal household voltage, 120V AC, 60Hz.
- Plug straight into the wall rather than through an extension cord. If you have to use one, Ryobi calls for 16 AWG at 25, 50 or 100 feet.
- Check the cord where it enters the housing for cuts, kinks or crush damage.
Here’s the part most guides leave out. Ryobi’s manual is explicit: if none of the LEDs are lit at any point during charging, take the battery pack off the charger to avoid damaging it, and do not insert another battery. Return the charger and battery to a service center.
The instinct is to grab a second pack and see whether that one lights up. Don’t. If the charger has failed in a way that gives no indication at all, you can damage the second pack too.
Don’t open the charger either. There are no user-serviceable parts inside, and Ryobi warns that incorrect reassembly creates a shock and fire risk.
If the outlet and the cord both check out and it still shows nothing, the charger has failed internally. That is a replacement rather than a repair.
Dead charger, no lights at all?
There is no repair path for this one, and Ryobi tells you not to keep trying batteries in it. Replace the charger.
4. Dirty Contacts, or a Pack That Won’t Seat
A pack that can’t make solid electrical contact behaves exactly like a faulty pack, and this is one of the easiest wins on the list.
The charger responds inconsistently. It reads the pack sometimes and not others, or the state changes when you press down on the battery. If the pack rocks in the tool or drops out when you hold a trimmer upright, you’re looking at the same underlying problem.
Look into the charger port and at the battery terminals for grass clippings, dust, corrosion or discoloration.
How To Fix It
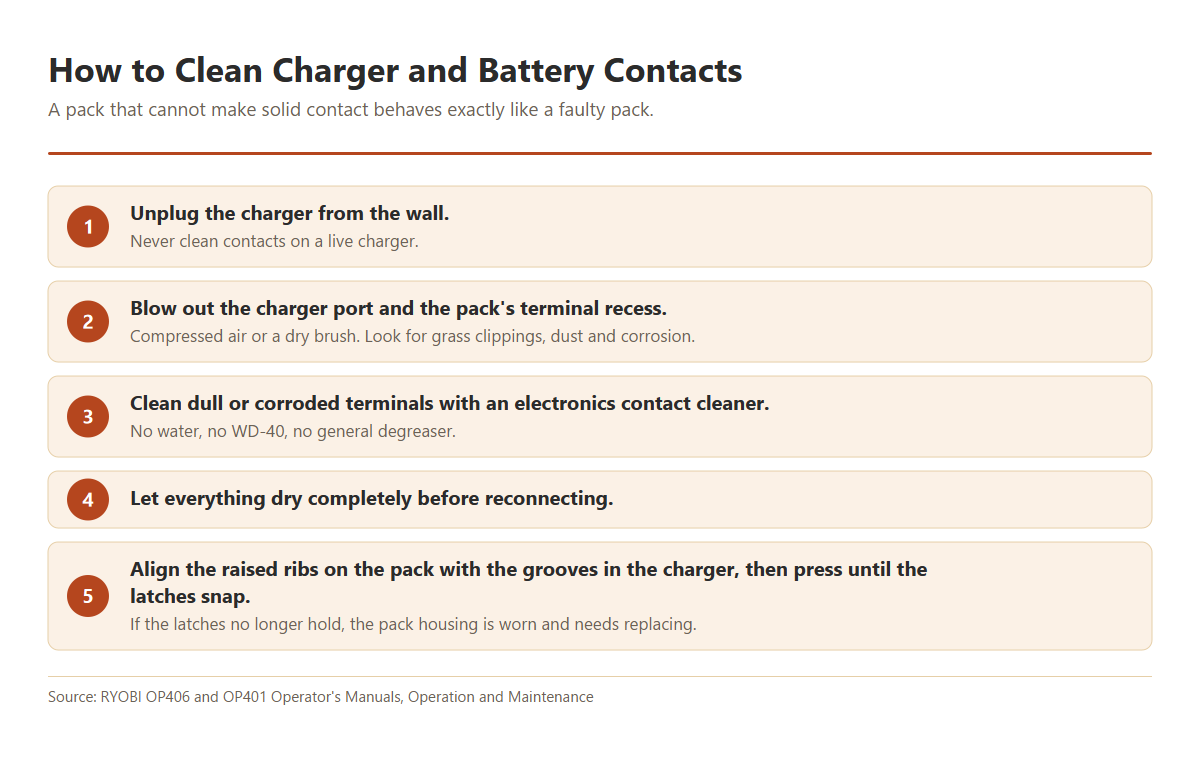
What you need: an electronics-safe contact cleaner that dries without residue, such as CRC QD Contact Cleaner. Don’t use water, WD-40 or a general degreaser on battery terminals.
If the pack still will not latch in the tool, the latch tabs on the housing are worn or cracked. That’s a mechanical failure of the pack rather than a charging fault, and it means you need a replacement.
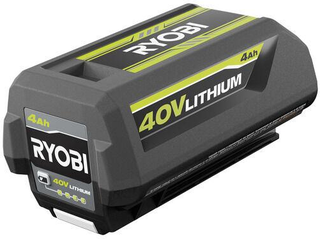
Worn latches, or a pack that keeps dropping out?
Once those housing tabs crack there’s no safe repair. A genuine pack keeps your tool’s protection circuit and warranty intact.
5. Your Battery Is Too Flat for the Charger to See It
A pack that sat in a cold shed all winter can self-discharge below the voltage the charger will accept. It either ignores the pack completely or throws the error pattern.
The fuel gauge usually shows nothing at all when you press the button.
How To Fix It
Use your standard charger for this, not the rapid one. This is a genuine difference between the two, and it’s in Ryobi’s own documentation.
The OP401 manual lists a deeply discharged state where the charger “conditions battery until normal voltage is reached, then begins charge mode.” The OP406 rapid charger’s chart has no such state.
- Put the pack on an OP400, OP401 or OP404 standard charger if you have one.
- Leave it alone. Conditioning is slow by design, so give it a few hours before you write the pack off.
- If it moves to green flashing, you’re charging normally again.
- If it still errors after conditioning, run the two-pack test to confirm which part failed.
Essential Safety Warning: reviving a flat pack
There are methods online for waking a dead pack by pulsing it on and off the charger, jumping it from a healthy battery, or feeding it from a bench power supply. Our Ryobi 40V battery guide covers these in detail.
None of them appear in any Ryobi manual, and all of them push current into a lithium pack while bypassing the protection circuit that exists to prevent exactly that. Cells that have sat below their minimum voltage can develop internal shorts, and thermal runaway can start hours after you walk away.
Stop immediately and recycle the pack if you see swelling or bulging, hear hissing, smell anything chemical, or feel unusual heat.
If you are not set up with eye protection, gloves, a ventilated space and a Class ABC or D extinguisher nearby, buy a replacement pack instead. Never use water on a lithium fire.
6. The Charger Says Full, but Your Tool Won’t Run
This one comes up constantly, and your charger isn’t the problem.
The charger shows green steady, meaning charging is complete. You press the fuel gauge button and all four lights come on. You drop the pack into the tool and nothing happens.
The fuel gauge measures voltage, not health. An aging pack can read completely full and still collapse the instant a motor asks it for real current.
That symptom has its own guide now. If your pack charges to four lights and then dies in minutes, or cuts out while the gauge still shows two or three, our guide to a Ryobi 40V battery that won’t hold a charge walks through the load test and the storage routine that fixes the self-discharge version of it.
How To Fix It
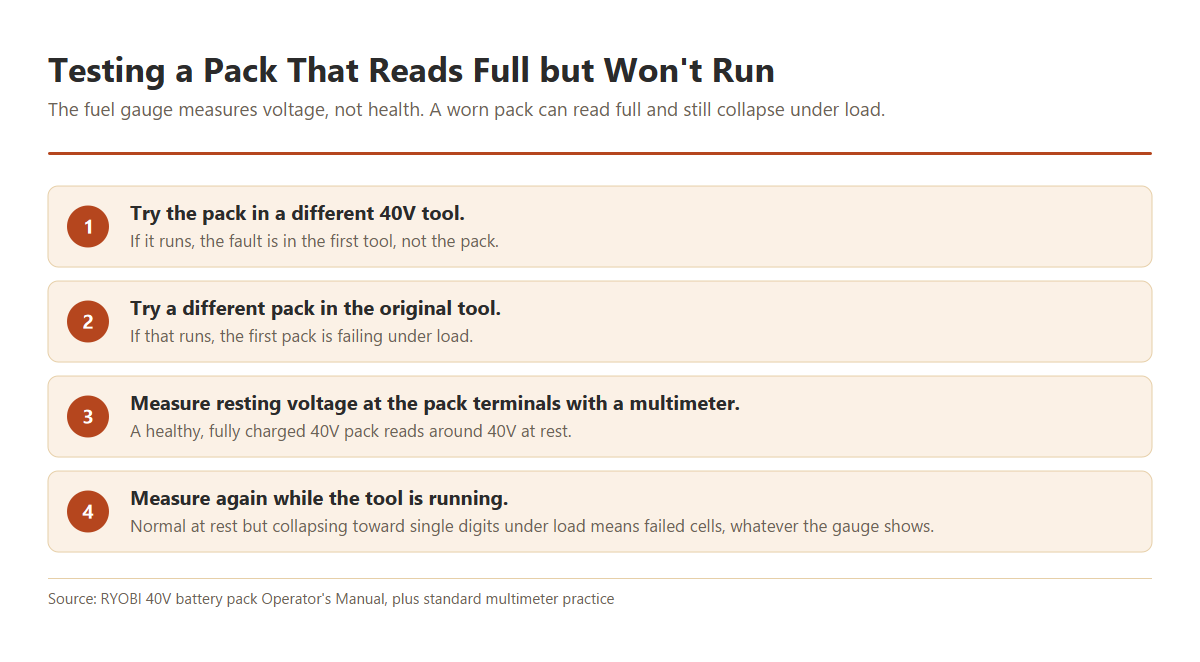
Check the tool’s contacts and safety interlocks as well. Many Ryobi tools won’t start unless the pack is fully latched.
If the tool runs for a few seconds then cuts out, the pack’s protection circuit is shutting things down. Ryobi’s note is to release the trigger to reset, but a pack that keeps doing this has reached the end of its life.
What you need for steps 3 and 4: a digital multimeter. Resting voltage alone won’t catch a worn pack, which is why the under-load reading in step 4 is the one that settles it.
This is a battery question rather than a charger question. Our Ryobi 40V battery troubleshooting guide goes deeper on packs that won’t hold a charge.
Confirmed your pack is the problem?
A pack that reads full and dies under load has failed cells inside. No charger setting brings those back.
Model-Specific Notes
Your charger
| Model | Type | Hot or cold pack shows | Conditions a flat pack? |
|---|---|---|---|
| OP400 | Standard (discontinued) | Red flashing, green off | Not documented |
| OP401 | Standard | Red flashing, green off | Yes |
| OP403 | Standard with USB | Red flashing, green off | Not documented |
| OP404 | Slim-line compact | Red flashing, green off | Not documented |
| OP406 / OP406A | Rapid | Both LEDs on steady | No such state |
All of them use red flashing plus green flashing for the error state, and green steady when charging is complete.
Your battery
The OP4015 (1.5Ah), OP4026 (2.6Ah), OP4030 (3.0Ah), OP4050 (5.0Ah) and OP40752 (7.5Ah) all use the same charging logic. Capacity changes how long charging takes, not what the lights mean.
Ryobi states that charge time varies with amp-hour capacity and doesn’t publish a fixed figure per model, so treat any specific minute count you read elsewhere with suspicion.
If you have an OP4026, you’re in the largest group of readers who write to us about this. It shipped with an enormous number of trimmers and blowers years ago, and those packs are now well past their design life.
If your part number starts with P
P104 and P117 aren’t 40V parts. They belong to Ryobi’s 18V ONE+ system, where P104 is a high-capacity battery and P117 is a dual-chemistry charger.
The two platforms aren’t interchangeable, and none of the light codes above apply to them. If your part number starts with P rather than OP, you’re troubleshooting an 18V problem.
Buying a Replacement Charger
You have run the two-pack test and know which part failed. Here’s how to replace it without wasting money.
Check your warranty first
Ryobi 40V chargers and batteries both carry a three-year limited warranty. That’s longer than most people assume, so check before you buy anything.
You will need proof of purchase with a date. If you registered the tool at register.ryobitools.com, that date is already on file. Ryobi’s support line is 1-800-860-4050, and Home Depot handles a lot of Ryobi warranty exchanges in store.
The warranty covers defects rather than wear. A four-year-old pack that no longer holds a charge has worn out, and that isn’t a claim.
The aftermarket gamble
Third-party chargers turn up at a fraction of the price, and this is the one accessory where we would tell you not to take that chance.
A charger’s entire job is deciding when to stop pushing current into a lithium pack, and refusing to charge one that’s too hot. An uncertified charger that gets that judgment wrong is a fire risk in your garage, and using one can cost you the warranty cover on your battery as well.
Which one to buy
Match the replacement to how you actually work.
The OP406A rapid charger is what you want if you run a mower or work through several packs in a session.
The standard 40V charger is slower, but it’s the one that documents a conditioning mode for deeply discharged packs. If you store batteries over winter, that makes it the better pick.
The OP404 slim-line compact charger is worth a look if your bench space is tight.
If your battery was the part that failed, a genuine RYOBI 40V 6.0Ah pack is the straightforward swap. Higher capacity buys you longer runtime, not more power, so size it to how long you need to work.
Out of warranty and out of options?
Run the two-pack test first so you replace the part that actually failed, then buy genuine once.
Recycling the old one
Don’t put a lithium pack in your household trash or curbside recycling. Take it to a battery drop-off point instead. Home Depot and Lowe’s both run collection bins, and Call2Recycle lists sites near you.
Related Ryobi Guides
- Ryobi 40V battery not charging: the hub guide, covering a pack the charger will not accept at all, including sleep-mode recovery.
- Ryobi battery flashing red and green: what the error code means, and the two-minute test that shows whether the pack or the charger failed.
- Ryobi 40V battery won’t hold a charge: a pack that charges to four lights then dies in minutes: worn cells, early cutouts, voltage sag and self-discharge in storage.
- Ryobi 18V ONE+ battery problems: the other platform: what the three charger lights mean, why flashing red is not a fault, and the protection circuit that stops your tool.
- Ryobi 40V lawn mower won’t start: the five start interlocks that stop a mower dead even with a fully charged pack, plus the test that separates a battery fault from a mower fault.
Frequently Asked Questions
Should the lights on my charger flash red and green with no battery in it?
No. With nothing inserted, every Ryobi 40V charger should show red on and green off, which means it’s ready to charge.
Red and green flashing on an empty charger is the error state with no battery present to blame, so your charger is at fault.
My 40V pack turns the light red, then it flashes green and red. What does that mean?
The charger accepted the pack, tested it, and reported an error. That’s Ryobi’s “battery pack or charger error” state.
Run the two-pack test. It’s the only way to tell which of the two parts has actually failed.
Is it my battery or my charger?
Put a second, known-good 40V pack on the same charger. If it charges normally, the charger is fine and your first pack has failed.
If the second pack shows the same error, replace the charger. That’s Ryobi’s own published procedure rather than a workaround.
My OP4026 is out of warranty and flashing red and green, and none of the standard fixes work
If a different pack charges fine on that charger, your OP4026 has reached the end of its life. These packs shipped in huge numbers well over a decade ago, and cell degradation isn’t repairable.
Try the conditioning route on a standard charger first. If that doesn’t bring it back, replace it and recycle the old one.
My pack shows all four lights but the tool does nothing. Is the charger to blame?
No. The charger has done its job, and the fuel gauge reports voltage rather than the pack’s ability to deliver current.
An aging pack can read full and still collapse under load. See cause 6.
What does it mean when my pack’s four lights flash twice?
Your pack is reporting a protection fault. Ryobi documents that a battery flashes an error code for at least five seconds, and lists out-of-range temperature, over-current and permanent failure as the conditions.
Ryobi doesn’t publish a lookup table linking a number of flashes to a specific fault, so anyone telling you that two flashes means one exact thing is guessing. Let the pack reach room temperature and try again. If the code persists on a charger that handles other packs fine, your pack has failed.
My battery won’t stay in the trimmer and falls out. Is that related to charging?
Not directly, though the same worn latch can stop your pack seating properly in the charger too.
Check the latch tabs on the pack housing. Once those crack, the pack can’t be repaired safely and needs replacing.
Does hot weather stop a Ryobi 40V battery charging?
Yes, and it is one of the most misread situations. Ryobi says not to charge below 50°F or above 100°F, and the charger enforces it.
A pack straight off a mower on a hot day sits in a temperature hold until it cools. On an OP406 that looks like both LEDs steady, and on an OP401 like red flashing. Neither is a fault.
Can I leave my battery on the charger all winter?
Ryobi’s guidance is to disconnect the charger from the power supply when it is not in use. Store your packs below 80°F, and away from anywhere that drops under 50°F or climbs past 100°F.
An unheated garage or shed in a cold climate sits outside that range for months, which is exactly why a pack you put away healthy comes back deeply discharged.
Can I use a non-Ryobi replacement charger?
You can, but we would not. The charger is the component deciding when to stop charging a lithium pack and when to refuse one that’s too hot.
Using an uncertified charger can also cost you the warranty cover on your battery. The saving isn’t worth it on this particular part.
Are P104 and P117 the same as my 40V gear?
No. Those are 18V ONE+ parts, which is a different platform with different chargers and different codes.
Nothing in this guide applies to them.
How long should a 40V pack take to charge?
Ryobi states only that charge time varies with the amp-hour capacity of your pack, and doesn’t publish a fixed figure per model.
A rapid charger is substantially faster than a standard one, and a 7.5Ah pack takes considerably longer than a 1.5Ah pack on the same charger. Be wary of any guide quoting exact minutes, because Ryobi doesn’t.
The One Test Worth Remembering
If you take nothing else from this page, take the two-pack test. Almost every charging question we get can be settled in two minutes by putting a second battery on the same charger and watching what it does.
Everything else is detail. Comments are open below if your symptom isn’t covered here, and your questions tend to become our next guide.
Sources: RYOBI OP406 and OP401 operator’s manuals (TTI Group North America), and the RYOBI 40V lithium-ion battery pack operator’s manual.
We may be paid a commission if you purchase through links on this page, at no extra cost to you.
