Is your Ryobi 40v battery not charging? I have some good news for you; it is possible to fix most Ryobi 40V battery problems yourself.
Replacement batteries are certainly not cheap, and most of us will want to avoid the need to buy a new battery if at all possible.
Let’s take a look at the most common Ryobi 40V battery problems and how to fix them.
Use the following table to diagnose and jump to the relevant section quickly.
| Symptom | Possible Cause | Solution |
|---|---|---|
| Battery not charging | Faulty charger | Test with another battery or charger |
| Electronics issue | Power-cycle your charger by unplugging and waiting a minute | |
| Battery inserted incorrectly | Ensure battery is correctly inserted; press gray button(s) while inserting | |
| Corroded or dirty terminals | Clean with sandpaper, rubbing alcohol, or wire brush | |
| Extreme temperatures | Ensure battery temperature is between 32°F to 113°F | |
| Battery is old | If battery is 3-4 years old or has 300-500 cycles, consider replacement | |
| Charger lights flashing red and green | Battery in “sleep mode” | Try micro charges or jump-start with another battery or DC power supply |
| Reset the battery by accessing internal reset pins |
[ez-toc]
Faulty Ryobi Battery Charger
If your Ryobi 40V battery isn’t charging, check if the charger is faulty should be the first thing you do.
But, testing if the charger is faulty isn’t as easy as you might like it to be. This is because we can’t use a multimeter to test the voltage output of the charger.
Ryobi battery chargers have sensors to detect a connected battery. If the charger doesn’t sense a battery, the charger won’t give the correct voltage.
This may cause you to incorrectly identify the battery charger as being the problem.
Power-Cycle Your Charger
Electronics can sometimes act strangely, and Ryobi chargers are no exception.
If your Ryobi 40V battery isn’t charging, first try unplugging the charger, wait for about a minute, then plug it back in.
If this does not solve the problem, move on to the next steps.
How To Check If Your Battery Charger is Faulty
There are two ways that you can check if your battery charger is faulty or not.
You will need a second battery or charger to test the two methods below.
Many people do not have a second battery or charger on hand, so here are some ideas on how to get access to one:
- Go to your local Ryobi dealer and ask if you can test your battery on their display charger or similar
- Ask in your local Facebook groups if anyone has a charger or battery you can try.
- Ask your friends or neighbors if they have a compatible charger or battery pack.
Use Another Battery
Take another healthy 40V Ryobi battery and try charging it. If you have the same problem, the charger is likely faulty.
If the second battery charges fine, your charger is fine, and the battery itself is the problem.
Try Another Charger
You can also use another Ryobi battery charger to check if yours is faulty. This is likely the only way to get a definite answer without a second battery.
Plug your battery into the second charger. If the battery fails to charge or the charger shows an error, then your battery is faulty.
If the battery charges up correctly, then your battery charger is the problem.

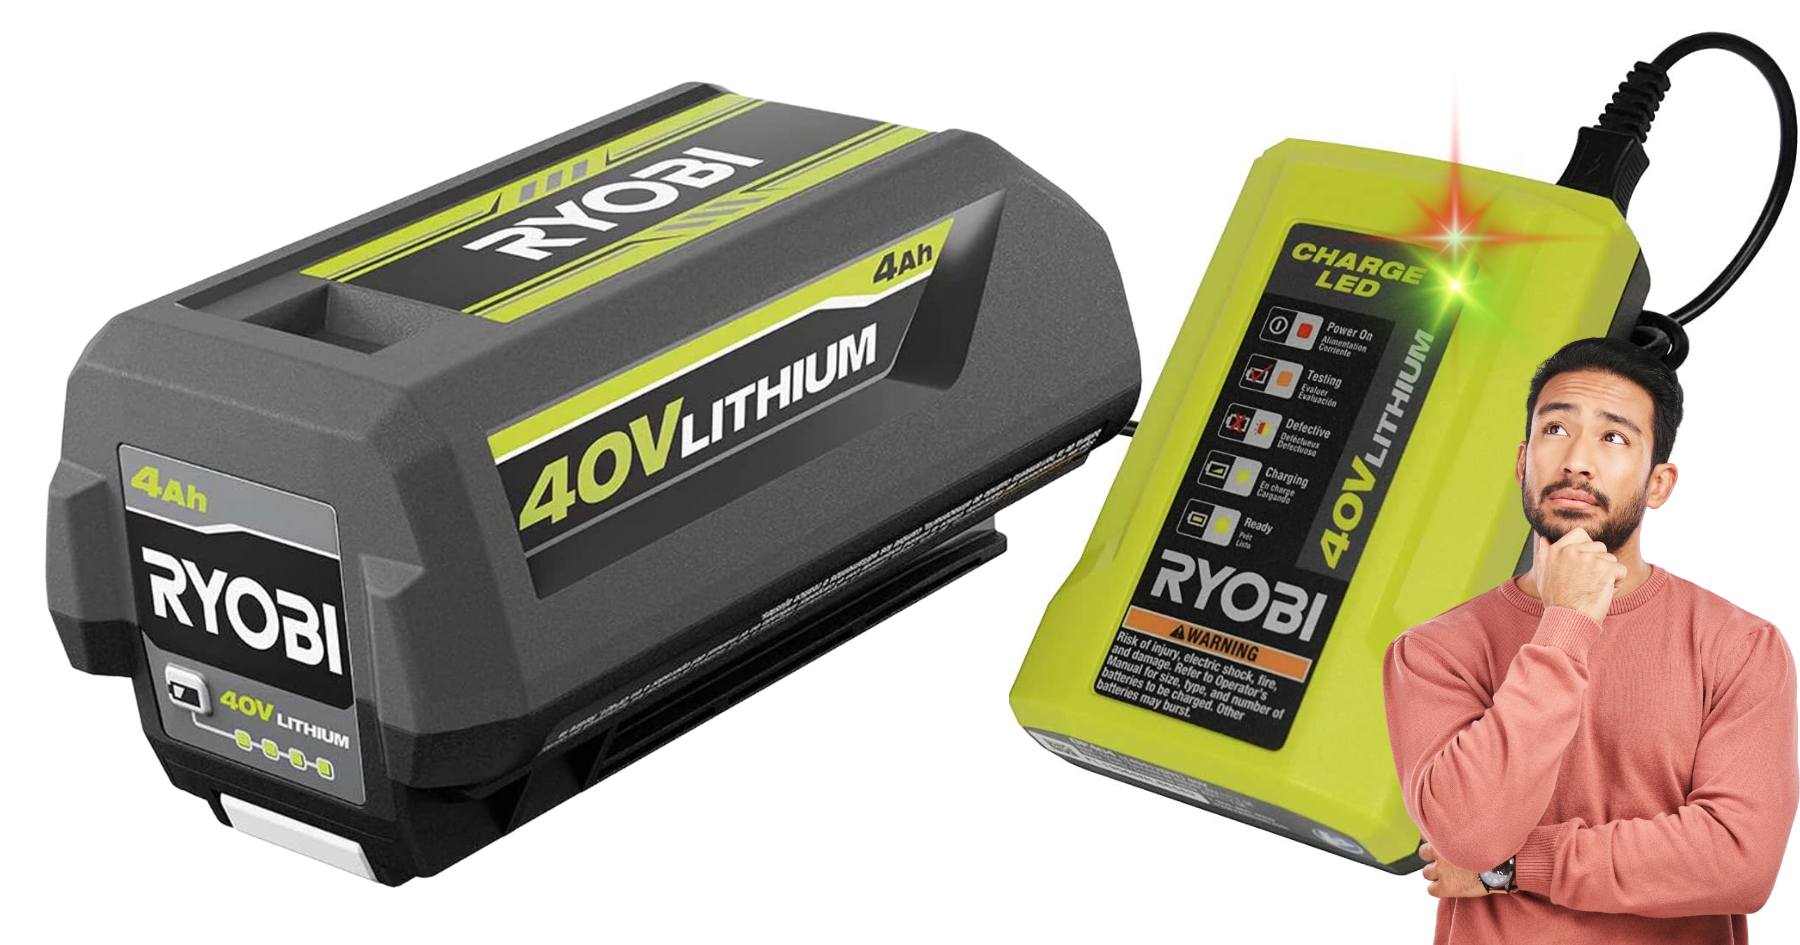
- New Slim Line design provides quick charge technology in a portable form factor
- Compatible with all Ryobi 40v batteries with battery protection technology for safe charging
- Status Indicator Monitors Battery During Charging

- OP401 2-Port replacement ryobi 40V lithium battery charger
- Fully compatible with All Ryobi 40-Volt lithium-ion battery models
- The charger 2Ports are able to charge 2 Ryobi 40V batteries at the same time,
- Diagnosticer with LED indicator continuously communicates battery charge statu
- CE, FCC, RoHS certified
Ryobi Charger Flashing Red and Green – Battery in Sleep Mode
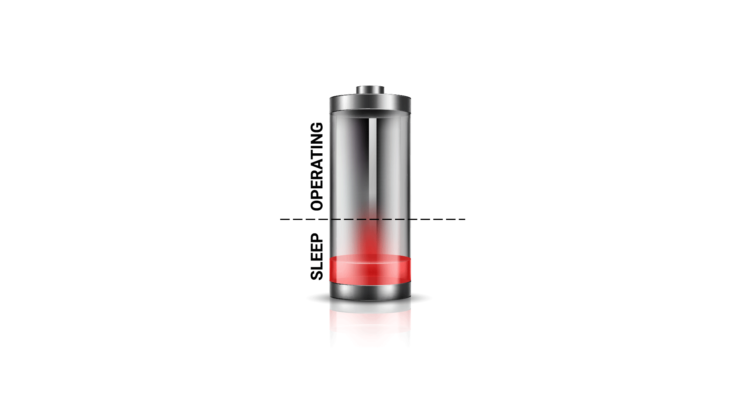
The most common cause for your Ryobi Charger flashing red and green lights is that the battery has been over-discharged.
This is commonly known as the battery is in “sleep mode”
Batteries often enter sleep mode when they’ve been used until completely dead and then stored without charging for a long period of time. The charge on the battery becomes so low that the charger cannot detect whether the battery is healthy or not.
The charger will stop charging and enter error mode to avoid damage to the charger from a faulty battery.
The problem with most Ryobi 40V chargers is that they don’t incorporate a “boost” feature that would allow a battery that has entered sleep mode to be woken up again.
Here are the best methods for fixing your Ryobi 40v battery that has entered sleep mode.
Micro Charges
This method is the easiest, safest and simplest method to try to revive your Ryobi battery that won’t charge.
Patience is required here – so read these instructions carefully and find somewhere comfortable to sit!
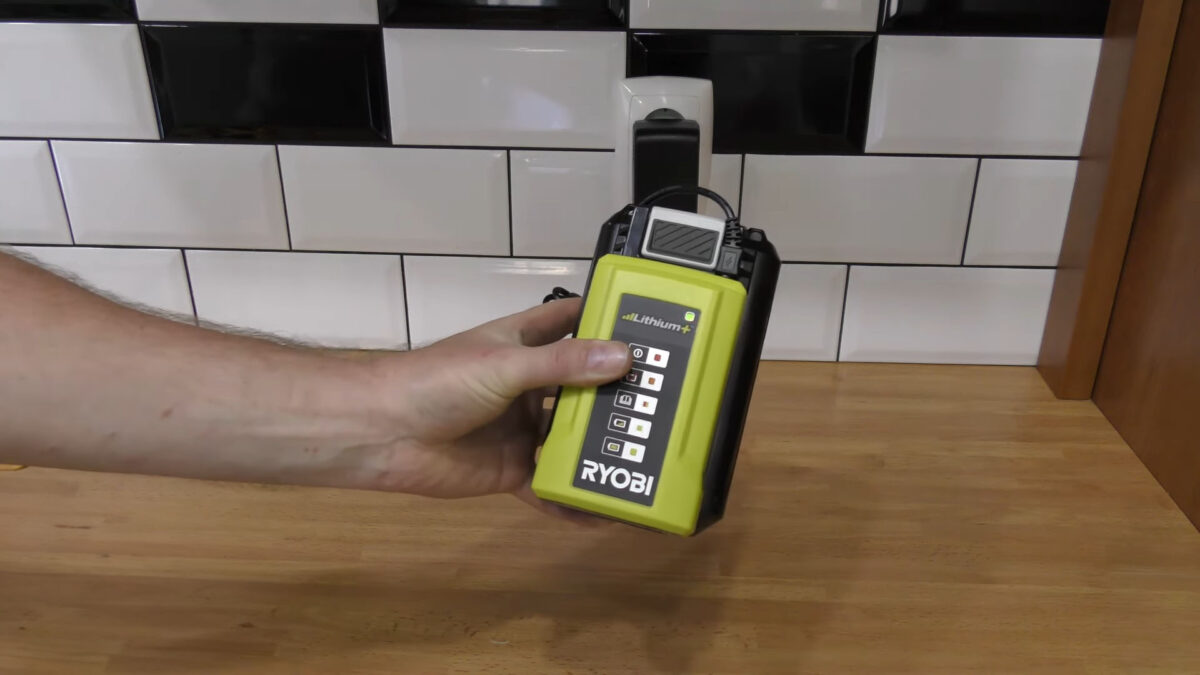
- Connect your charger to the power outlet
- Place the battery in the charger until the green indicator goes solid
- Just before the red/green lights start flashing, remove the battery from the charger
- Re-insert the battery into the charger again and repeat steps 2-3
- Do this until the green light flashes constantly (might take up to 30 minutes)
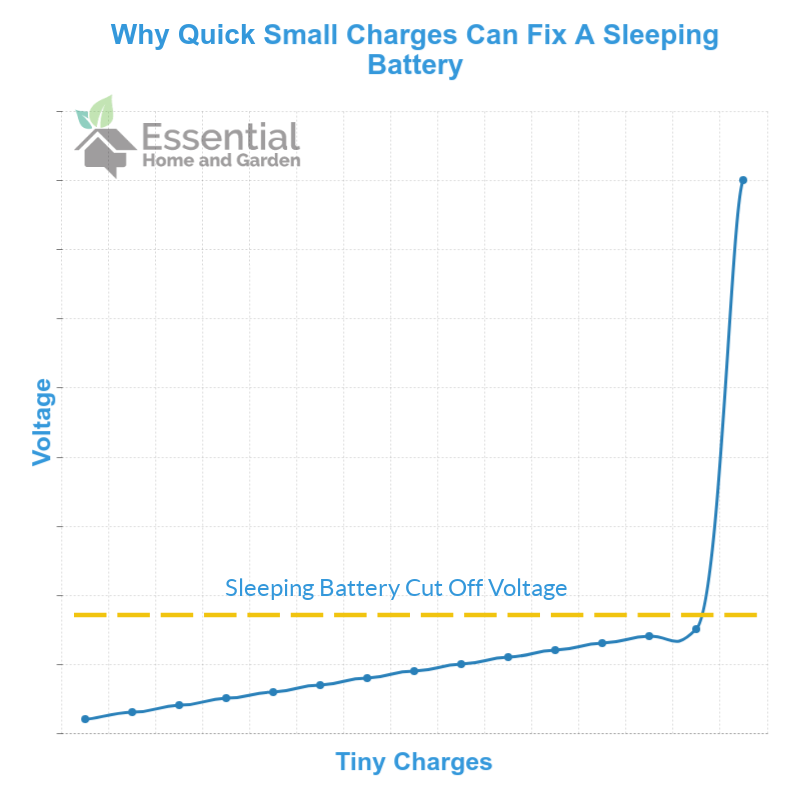
Why does this work? Each time you put the battery in the charger, the charger gives a small charge before sensing the battery is asleep.
So repeating this process over and over results in the battery slowly being charged in very small increments each time.
Eventually, this results in enough charge for the battery charger to resume normal charging operation.
It may sound crazy, but the graph above shows why it works. Also, take a look at the many pages of comments below this article to see just how often it actually works!
Also Read: Ryobi Pressure Washer Troubleshooting
Jump Starting With a Second Ryobi Battery
For this method, you will need:
- A second, healthy, and fully charged Ryobi 40v battery
- Some wire – standard speaker wire or similar will do the job
The method is as follows:
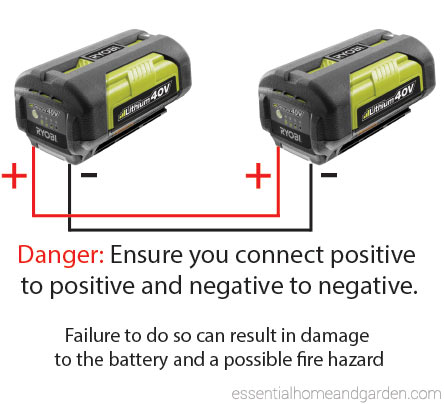
- Connect the positive (+) terminals from the healthy battery to the sleeping battery’s positive (+) terminal.
- Do the same with the negative (-) terminals.
- Leave the batteries connected for up to 20 minutes
- Disconnect and test the sleeping battery on the charger again
This method may be enough to kick your sleeping battery back into life.
Danger! As with any DIY fix with cordless tool batteries, these methods have some dangers.
Battery university recommends not boosting batteries that have been in sleep mode for a week or longer.
The video below shows in more detail how to do this.
Use a DC Power Supply To Jump Start Your 40V Battery
This method is essentially the same as using a second battery, but instead we use a DC power supply set at the same output voltage (40v)
You will need:
- A DC power supply capable of outputting 40 volts DC
- Some wire – standard speaker wire or similar will do the job
The method is as follows:
- Connect the positive (+) terminals from DC power supply output to the sleeping battery’s positive (+) terminal.
- Do the same with the negative (-) terminals.
- Leave the battery connected to the power supply for up to 20 minutes
- Disconnect and test the sleeping battery on the charger again
Reset the Battery
This method means you’ll open the battery to reach the internal reset parts and see the printed circuit board (PCB)
Danger: Lithium batteries can be dangerous when dismantling them. There is a danger of fire or injury – do not attempt this procedure if you are not qualified to do so.
You will need:
- A torx security screwdriver kit with a T10 size or a Phillips head screwdriver (depending on what screws are used in your battery)
- A short piece of insulated wire with stripped ends
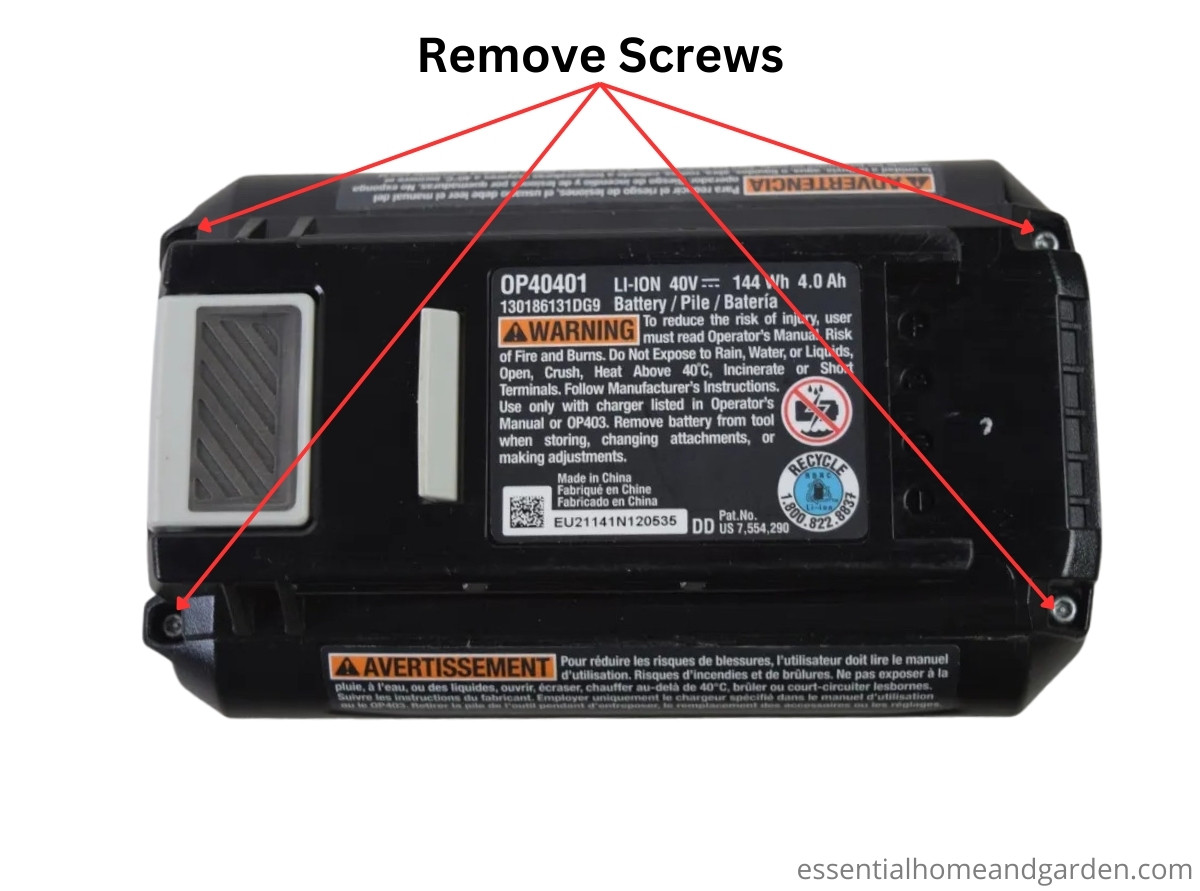
1. Remove the screws holding on the plastic cover
Depending on the model of your battery, these screws may be a torx security screw or a standard Phillips head.
There will likely be four screws to remove, and some or all of them may be covered by a plastic plug or cover to access them.
2. Remove the cover
Once the screws are removed, you should be able to love the cover off.
You may need to cut the Ryobi sticker that goes over the seam between the cover and the base of the battery.
This should give you access to the battery PCB.
At this point you need to be very careful not to short-circuit any connections. Doing so could lead to a fire or electrical shock.
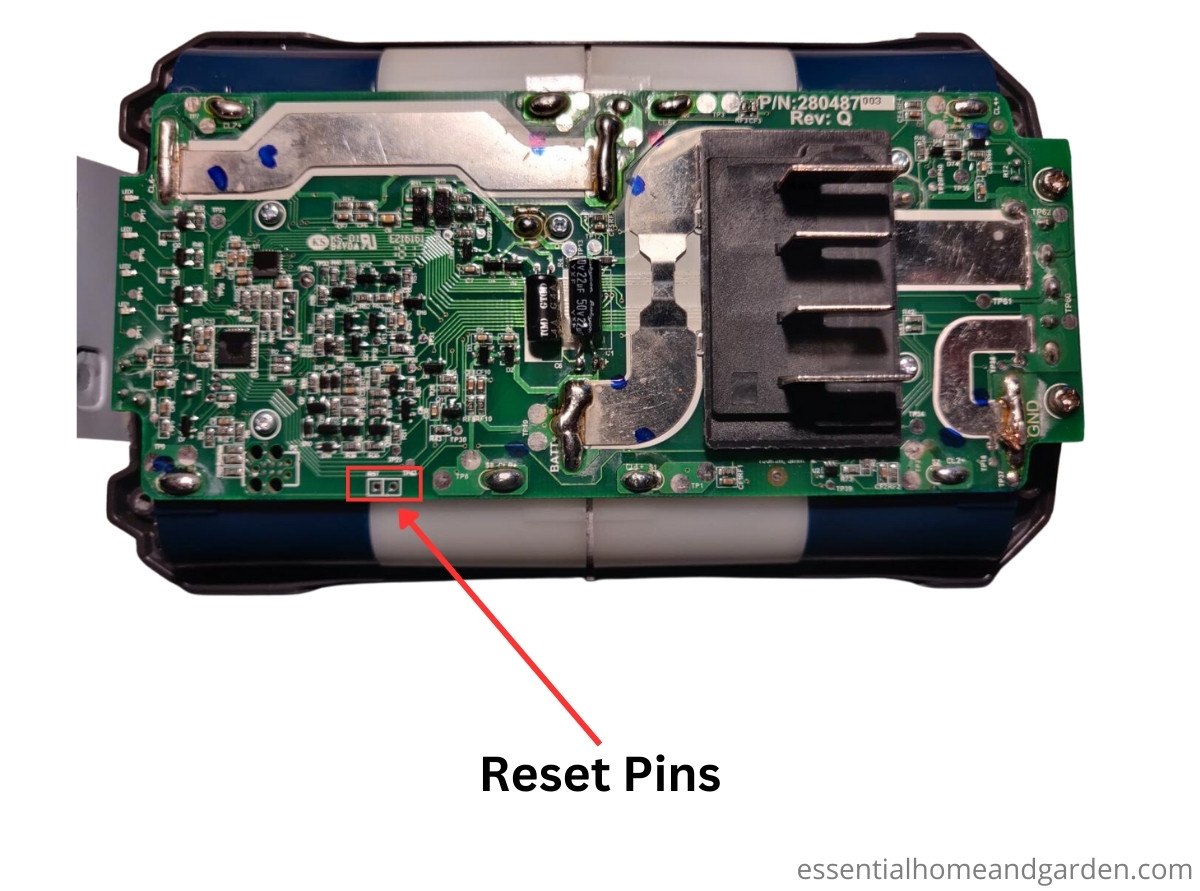
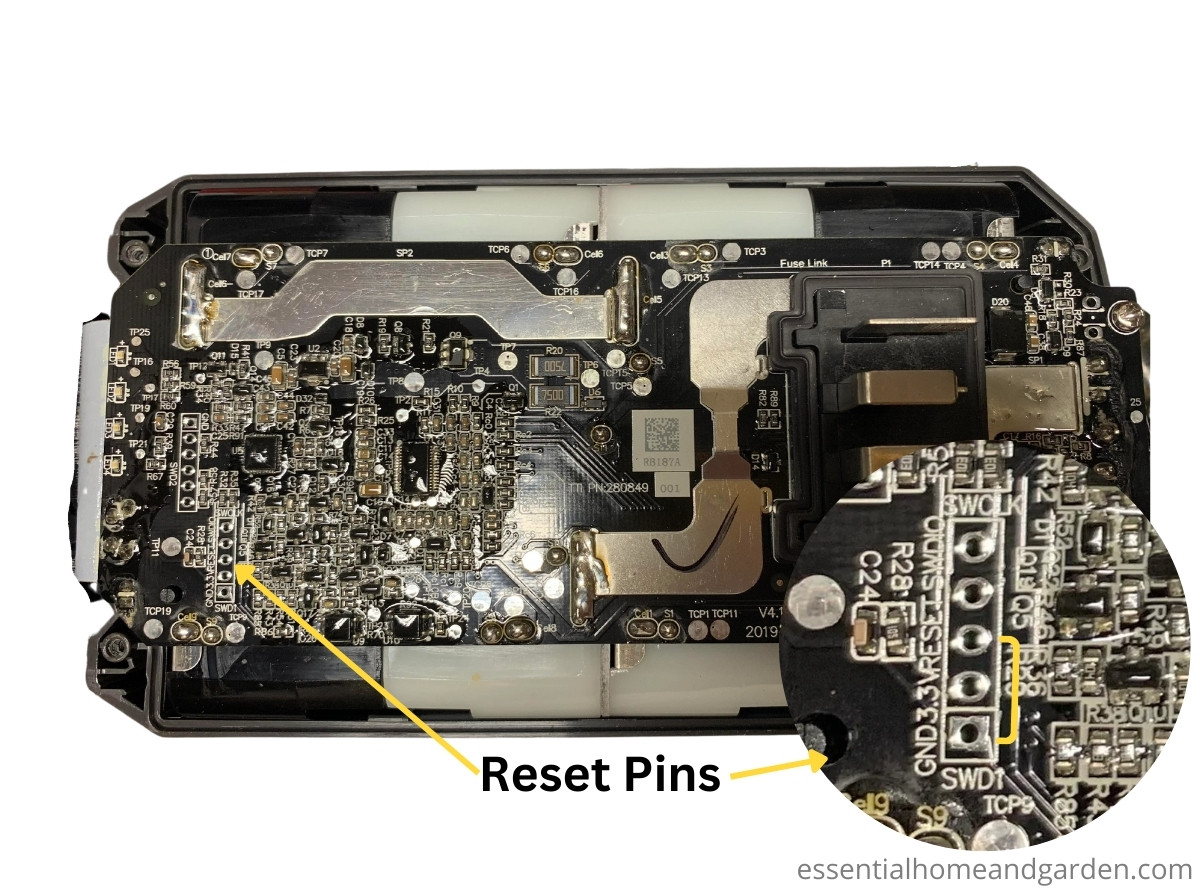
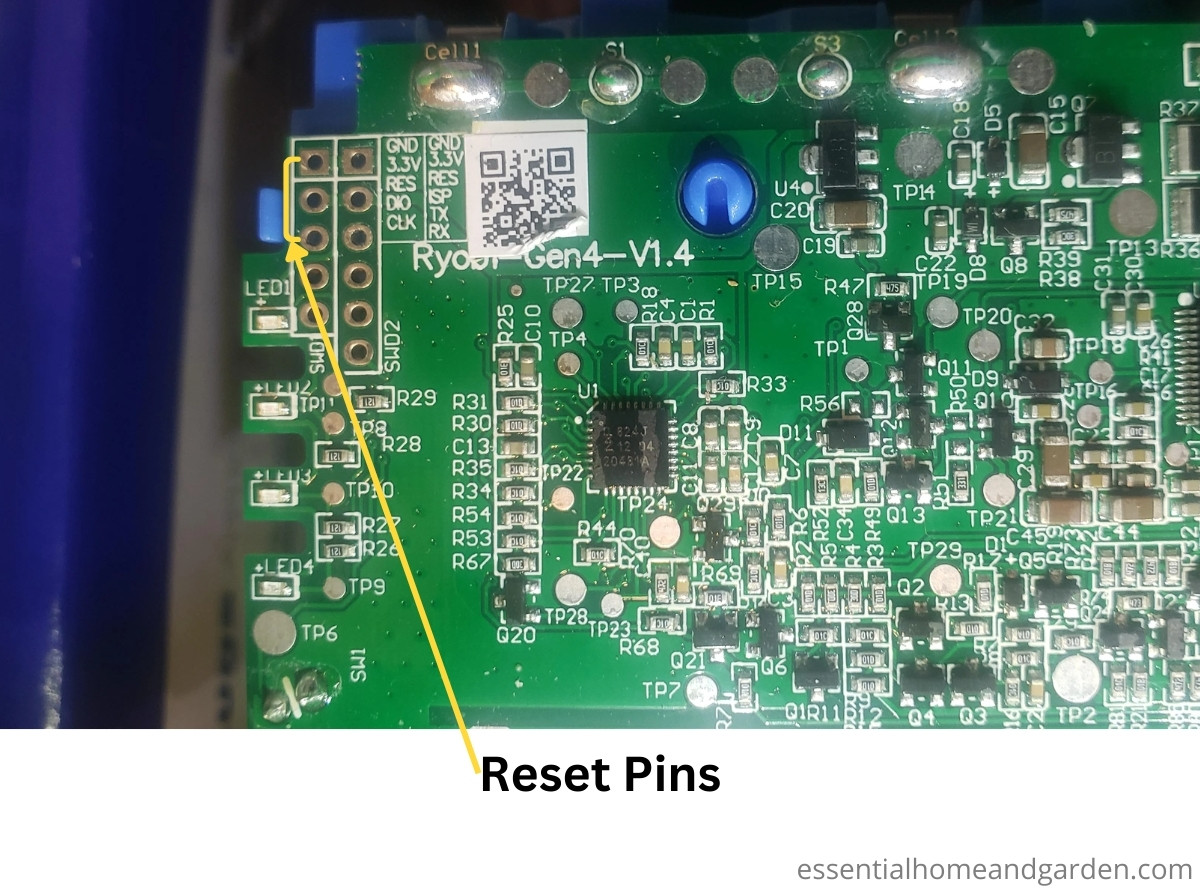
3. Locate The Reset Pins
The Ryobi 40v battery reset pins location depends on the model number.
You are looking for “pads” or pins labeled ‘RST’, ‘RES‘ or ‘RESET’
Your model of battery may be listed below, if not it is likely to look very similar – so follow the same instructions,
4. Short out the reset pins
Take your wire with stripped ends and very carefully connect the two reset pins.
Connect the reset pins for 2-3 seconds. You should notice that the lights on the battery pack light up. Now, remove the wire.
Be VERY careful not to short out any other pins or circuitry.
5. Test your battery
You can now reassemble your Ryobi battery (leave the screws out for now) and test if it charges correctly.
If it does, put the screws back in and celebrate!
There is also a good video on this process below.
Battery Inserted Incorrectly
It may seem obvious, but it is essential to ensure your battery is correctly inserted into the charger.
Most Ryobi 40v batteries have a gray button (or buttons) that should be pressed down when inserting the battery into the charger.
Push the gray buttons and slide the battery onto the charger – you should hear an audible click.
Corroded or Dirty Battery Terminals
If the metal contacts on the battery or charger become dirty or corroded, then it can cause the Ryobi charger to assume that the battery is faulty incorrectly.
If your terminals are corroded: then the corrosion can be removed with a piece of sandpaper or some rubbing alcohol and a Q tip.
Dirt on the terminals can be removed with a wire brush or an alcohol-soaked wipe or q tip.
Sometimes, getting to the actual terminals can be difficult because they are recessed. If this is the case you will need to try different tools or items to reach them for cleaning purposes.
Ryobi Battery Charging: Issues with Hot or Cold Temperatures
We like modern Li-Ion batteries, but they have issues old batteries didn’t face.
One of these is the narrower range of temperatures that they will operate and charge in: Li-Ion batteries will generally charge between 32°F to 113°F (0°C to 45°C).
So, the first thing to check if you are having problems with your Ryobi batteries is if they are indeed too hot or too cold.
If it is exceptionally cold where you usually store/charge your batteries, bring them inside and let them warm up to room temperature and then try charging them again.
If it is a hot day, or you have been using your batteries already and they are quite hot, try throwing them in the fridge, or taking them to a cooler area for a short amount of time before trying to charge them again.
Related Article: Ryobi 18v string Trimmer Troubleshooting
Is The Battery Too Old?
Unfortunately, it could simply be that your Ryobi tool’s 40-volt lithium-ion battery is simply getting old.
Typically, a Ryobi battery or any 40-volt lithium-ion battery maintains its performance for two to three years, or approximately 300 to 500 charge cycles.
One charge cycle describes the timeline between completely charging the battery, utilizing it until it’s fully discharged, and then charging it up once more.
Once your Ryobi 40-volt battery reaches its third or fourth year, you may begin noticing performance issues.
This could mean the battery’s inability to retain enough charge or, in more serious cases, it might fail to recharge entirely. Should you encounter this situation, replacing the old battery pack with a new one is recommended.
You can purchase a new battery here.

- Works with all RYOBI 40-Volt lithium-ion tools and chargers
- 40-Volt 5.0 Ah high capacity battery for extended run time
- Fade-free lithium-ion power
- Onboard battery life indicator
- Model OP4050A

- Works with all RYOBI 40-Volt lithium-ion tools and chargers
- 40-Volt 6.0 Ah high capacity battery for extended run time
- Fade-free lithium-ion power
- Onboard battery life indicator
- Model OP4060A
What Do The Lights on My Charger Mean?
The lights on your Ryobi charger help you determine the problem with your 40v battery.
The following table is a generic guide as to what the red, green and orange lights mean on your charger:
| Battery Pack Condition | Red LED Status | Green LED Status | Orange LED Status | Action/Description |
| Power On | ON | OFF | OFF | Plugged into AC power supply without battery pack |
| Testing (Hot battery pack) | OFF | OFF | ON | When the battery pack reaches cooler temperature, the charger begins charge mode. |
| Testing (Cold battery pack) | OFF | OFF | ON | The charger conditions battery until normal voltage is reached, then begins charge mode. |
| Testing (Deeply discharged) | OFF | OFF | ON | The battery pack or charger is defective. |
| Defective | Flashing | Flashing | OFF | When the battery pack reaches a cooler temperature, the charger begins charge mode. |
Where Can I Buy Ryobi Replacement Parts?
If you need your replacement Ryobi 40V battery parts in a hurry, then you will want to head straight down to the closest supplier and buy it locally.
If you aren’t in too much of a rush and want to save some cash, consider purchasing from a reputable online store such as Amazon.
- Click here to see a selection of Ryobi 40V Batteries and Chargers.
- Also Available at Home Depot
Frequently Asked Questions
Can a Ryobi cordless tool battery be repaired?
Yes, you can repair a Ryobi cordless battery. But, it might take too much time and effort.
Opening up the batteries can be difficult; depending on what part is faulty, it may be quite expensive to fix.
Remember that batteries can be dangerous, so it’s best to get a qualified technician to check the battery for you.
Is it OK to leave a Ryobi Lithium-Ion Battery On The Charger?
No, you should charge the battery after use until it is full, then remove it from the charger and store it in an area that doesn’t get too hot or cold.
The ideal battery storage temperature is around 59℉, but standard room temperature is usually fine.

![[2Pack] 40 Volt Battery for RYOBI 40V Power Tools - Generic](https://m.media-amazon.com/images/I/41SHRdnuqXL._SL500_.jpg)
Aaron you are the expert. I picked up one of these units. When I go to use it it runs around high speed for a few seconds and then completely stops. I put the battery on the charger and it lights up steady green. If I then put it back on the weed eater it will do the same thing. Just runs a few seconds and shuts off
Hi Brian,
That certainly sounds like a faulty battery. How old is it?
I’m not sure of the age. I picked it up second hand. The entire unit, battery and weed eater are both in exceptional condition. I would doubt if it was used more than once or twice. Is there a date code anywhere?
Two other things I’ve noticed. First, the battery indicator on the battery does not work. Second, if I run the weed eater at a slower speed, it will run quite awhile. By ower speed ,I mean somewhere between half power and full power
Yep, certainly sounds like a battery that needs replacing.
I had the same problem, just as you describe. Found that if I give the battery a nudge with my fist in the direction to reseat it, it runs again, for a while. I believe there’s a connection somewhere that’s lossening up with the vibration and this method serves to reconnect it?
Got to LOVE the fist motivating method! A hammer works just a good too btw 🤣
I had that problem and actually had to be fixed by a repair person and it was still under warranty and it had nothing to do with the battery it was another piece and it works like a champ
Hi Aaron, I have a Ryobi cordless drill, I don’t use it often and it won’t charge it just continues to flash red? does this mean it is stuffed? I have never dropped this drill and it is still in mint condition but I think it would be out of warranty? help
Did you try the any of the methods listed in the article? Which ones?
I tried method three, and all it did was ruin my charger. Now the charger flashes red and green as soon as it’s plugged in, without even having a battery mounted on it. Is there a fix for this?
Hi Larry,
The only thing that I can think of is that you have accidentally bumped one of the contacts out of place? Check that the contacts on your charger and battery are clean and look to be where they are meant to be.
What is the model number of your charger and battery?
I have a 40 volt Ryobi that displays a 100% charge, but only has 19 volts on the terminals. Initially, it had 40 volts across the terminals, and would not power a trimmer, so I assumed the trimmer was bad and replaced it. The new battery works fine in either tool.
Not sure why it would display 100% charge, and have 40 volts on the terminals, but still not power anything. I am equally unsure why the battery initially showed 100% with 40 volts across the terminals, but now only has 19 volts and still shows 100%.
Thinking the circuit board must be bad, but interested in your thoughts
To me it seems like the battery might be going into a protection mode for some reason? How old is the battery?
When I press the button on the battery all green lights work but go out when button released
When I place battery on charger red light flashes but no green lights work
Are you able to check a different charger?
I also experienced a battery failure, under warranty, and Ryobi shipped a replacement battery and charger. The new charger didn’t work! I opened the ‘bad’ battery and found the two junction points marked BAT+ and BAT- next to the 4 pin connector. I jumped from the good battery charging terminals, to the defective battery +- terminals (with a spark!). In 1 minute increments, followed by a charge attempt. After 4 minutes I put it in the good charger and it fully charged! So, I have two good batteries and know how to resuscitate them. Good luck!
Good evening. I haven’t used my trimmer since August. Brand new battery in July and the battery was left on the charger in the garage . Garage is not heated and I just went out and saw that the charger was red. I pressed the button on the battery to see if It was fully charged and nothing lit up. I attached It to the trimmer and It did not work obviously because It is not charged. Not sure if the cold has anything to do with it? Any thoughts?
Have you got a multimeter to test the battery voltage? I would try bringing the battery charger and battery inside, let it warm to room temperature then try charging again. But it is possible that for some reason the battery has lost all of its charge causing it to enter sleep mode.
Hi, Aaron! I recently purchased a new Ryobi OP4015 40v battery. I’m trying to charge it. 1st the charger was flashing green, & I had 2 lights flashing, then a little while later the charger turned flashing red, & battery went down to 1 cell being charged. I’ve already tried your 3rd option & worked for a while, but could I possibly have a bad charger? It’s what I’m beginning to think. Anyway, could you please give me some insight on what you think it might be? Thank you very much! Alan Brinkman.
Hi Alan,
I think the best bet is to take the charger and battery into your local tool shop and get them to give it a quick check. They should have new chargers in stock to test your battery on to work out which is at fault.
Otherwise, you might need to contact Ryobi support.
Thanks for sharing your insight.
I have a brand new battery – never been charged since original purchase at HD on a blower.
I have two batteries so have had them hooked together as described for over one hour with no results. It has been sitting in my garage for several months, so the idea of “sleeping” makes since but it does not seem to take the charge from the other battery. Have you had any luck contacting Ryobi or is there a warranty on these batteries?
Thanks.
Hi Dan, When did you purchase the battery? If it is under warranty still then there should be no problem – you can find more details here: https://www.ryobitools.com/support/warranties
Hello Aaron. I have 2 40 volt ryobi batteries with a similar problem. The first one showed as faulty on the charger. I eventually tried a different charger and it took a charge! I used it one time in my trimmer and charged it. It showed a full charge but wouldn’t work again. It’s showing 19 volts more or less with a volt meter. I have the same symptoms with a battery someone gave me. Lights showing full charge, 19 volts and not working. I left them in the charger several hours just to see if the lights were incorrect but the voltage stayed around 19. A common occurrence? Thanks
Have you tried option 3? It is highly possible that your batteries are faulty though. If you want to let me know the model number of your tools/battery I can look up a replacement for you.
So, Aaron. You said if solution #3 wouldn’t work for me, I might have a dead battery, which I assumed I did in the first place. So if that is the case, what’s my answer? Is there no other way to reserrect the battery? Should I keep trying to slide it in & out of the charger until the charger recoginizes the battery? I’m stumped here. Just trying to find a quick fix, so I don’t have to purchase a new or used battery! Thanks, again! Alan Brinkman.
It is certainly sounding like you have a dead battery Alan, which unfortunately means replacing it. Send me more details if you like: aaron (at) essentialhomeandgarden dot com and I can help you source what you need.
Hi Ken,
I have a 40 volt blower and use it to blow fluffy snow off my drive. I have 3 batteries and it takes all three to do my drive and our elderly neighbors too.
A few days ago I tried to charge one of the batteries and it would not take a charge, thinking it might be too low,due to being cold, I sat it in the house near the register and left it for an hour. When I put it back on charge, it took a charge just fine. Then today I cleared the snow again and following the cleanup, I placed that battery in the charger again, and again, it will not take a charge. The air temp is 18 degrees today, so I did not do the warm up thing again, but maybe tomorrow.
Can the cells be replaced, making it new again, if this continues to happen?
Hi Bill, if your batteries are too hot or cold then they may not take charge until the temperature normalizes. While you can replace the cells in the batteries, the amount of time it takes you, the cost of the cells and not to mention the possible safety implications make this barely worth it.
I would highly recommend looking for new batteries (non-genuine are fine.) If you are having trouble finding a replacement let me know and I can help find an exact match, but Amazon should have you covered.
I have a P104 lithium battery that shows full charge on both the charger and on the battery, but will not work when placed in any of my Ryobi tools. Any suggestions?
Has it got dirty terminals perhaps? You could try testing the output voltage with a multimeter to see if there is voltage present. But that does sound suspiciously like it could be faulty circuitry on the batter control board.
Otherwise there are some third party batteries on Amazon that are a direct replacement for the P104’s here: http://amzn.to/2lzxc2f By all reports these batteries are just as good as genuine Ryobi’s.
I am trying to determine if I have a bad batteries or a bad charger. When I plug the charger into the wall, the red light comes on. When I plug a battery into the charger, the charger flashes green 6 times, then red, green, red, then the light goes out. The light will not come back on unless I unplug the charger for several minutes then plug it back in.
Has anyone experienced this? If the battery is bad, it is supposed to continue flashing red/green (not turn off completely from my understanding
Hi Chris, have you tried checking the voltage of the battery with a multimeter?
since there are no flashing lights, I didn’t think any of the solutions you offered would apply. after trying #3 I still have a battery the charger indicates is ready for use, only to get a second of power from the tool you sent. if this is the quality of your items, I would like to return the tool and get a refund.
Hi Ken, I am not Ryobi – for their support I suggest you try this page: https://www.ryobitools.com/support/warranties
the charger light changes from red to green within seconds and battery remains uncharged
Hi Ken, what have you tried?
Hi, Aaron! I have a bit of a problem. I tried the solution #3, out & in for 30 minutes, but the red & green lights keep flashing. Do I need to do this for a longer period of time? Or what is the actual “key” do doing step 3? I really need to get this battery going, again! Is it possible the battery is frozen inside, & won’t budge? Please try to let me know if you can! Thank you!
Hi Alan, Sorry it took me so long to reply. Unfortunately, if fix 3 isn’t working for you then you may just have a dead battery. Is there any reason that you can’t replace the battery? Feel free to email me for a quicker response on admin (@) essentialhomeandgarden DOT com
Hi, Aaron! Yes it is possible to replace the battery, I’m trying not to because of the expense. So let me ask you, if my battery is dead, is there no other way to bring it back to life, short of re-building the parts, which I have no knowledge of? Or does it have to be discarded at this point? I use it for my snow blower, which only gets used a few times a year.
Hey Alan, unfortunately if you don’t feel like replacing the individual cells and/or the circuit board in the battery then there is no magical way to revive them – apart from those I mentioned in the article.
Amazon has the new ones, Otherwise if you are looking to save some money then maybe look for second hand units?
I had discovered method 3 myself. I have, however, a different problem. My charger APPEARS to be charging – green lights flashing on both charger and battery – however, the battery is not charging above the current level. I have two chargers and three batteries (multiple Ryobi 40 v. tools.) Two of the batteries have solid green on the first of four lights and flash on the second. The third, flashes on the very first light. Both chargers have the same “manifestations.” This all started after using my leaf blower with all three batteries, and trying to recharge. No previous problems.
Hi Sherm thanks for the comment. So none of your 3 batteries are working?
Dear Lord, thank you thank you thank you thank you thank you for these tips! The one that requires patience, the last one that you suggest, it works like a charm. And thank God! YOUR WEBSITE JUST SAVED MY BUTT!!! Thank you thank you thank you! Hahaha! I’m thrilled to say the Ryobi is charging now, and truly thanks to you! Praise the Lord!
Ashley, your comment has made my day! Thanks for letting me know that our fixes worked for you! Maybe head across to our facebook page and like us there!
Option 3 worked great thanks
Awesome, thanks for letting me know!