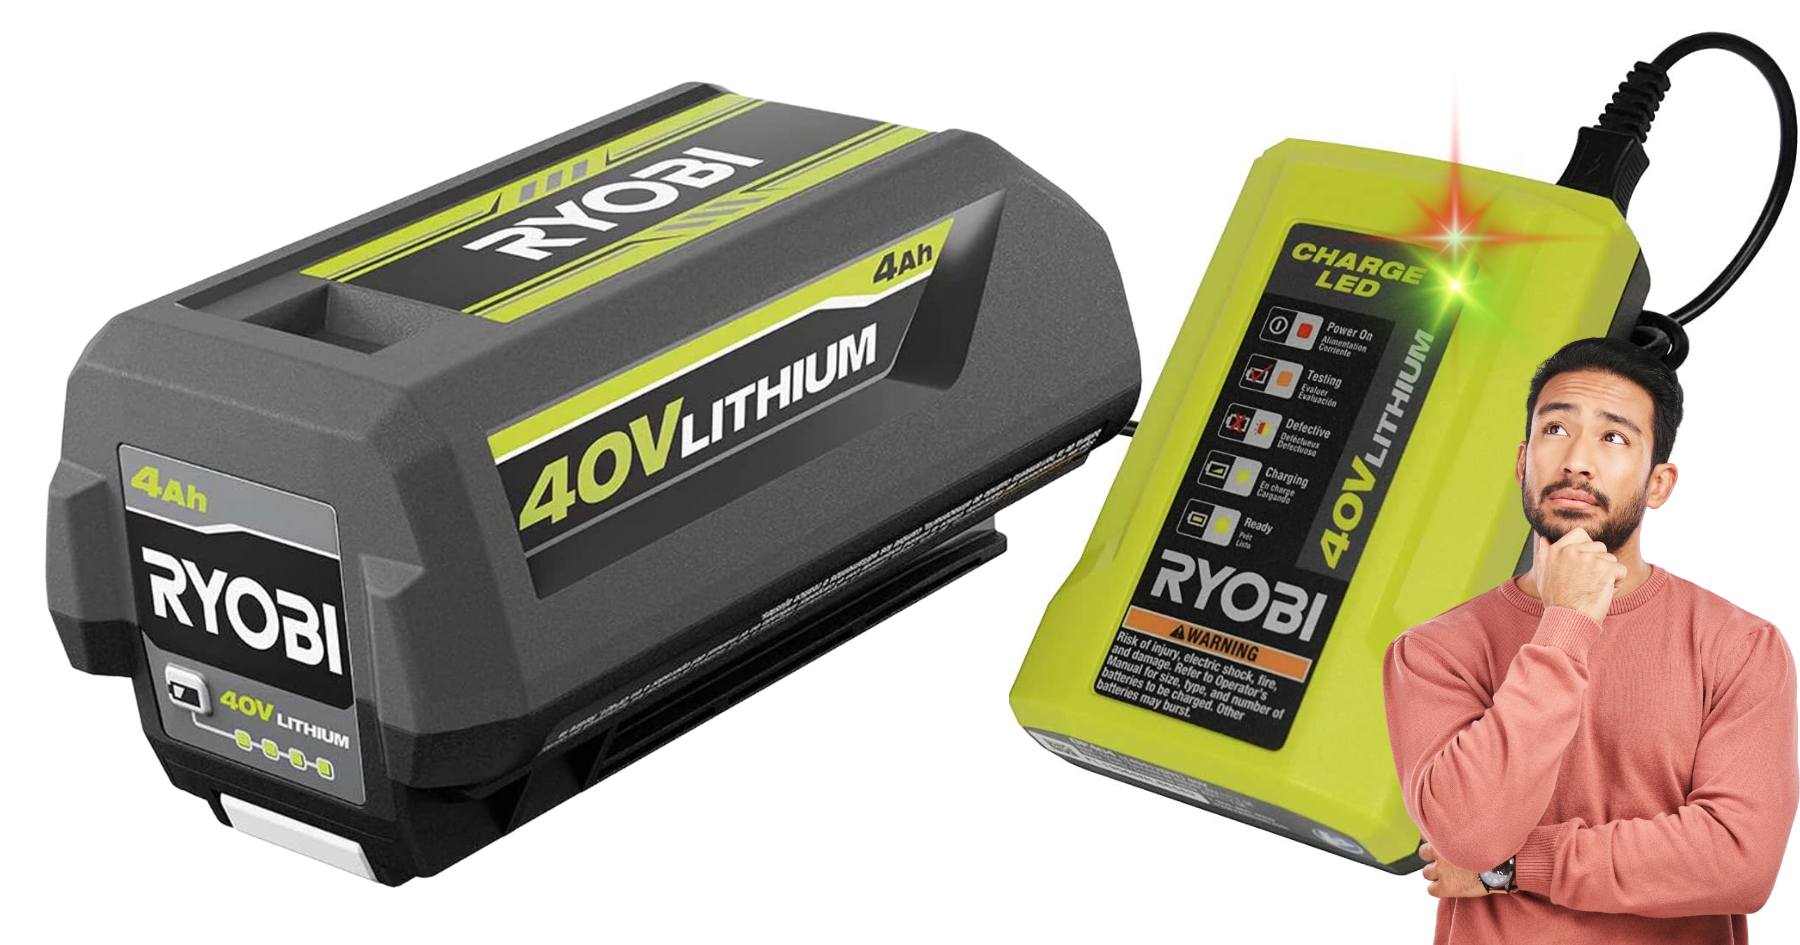
Is your Ryobi 40V battery not charging? We have some good news for you: it is possible to fix many common Ryobi 40V battery problems yourself.
The Ryobi 40V ecosystem offers a fantastic combination of power and convenience for a huge range of yard tools, from mowers to leaf blowers. However, this convenience comes with a significant investment, as replacement batteries are certainly not cheap.
When a battery fails to charge, often signaled by the frustrating flashing red and green lights, the thought of buying an expensive replacement can be daunting. The good news is that many of these issues are diagnosable and repairable.
This guide moves beyond simple fixes to address the full spectrum of failures, from basic user errors to complex internal faults.
Let’s take a look at the most common Ryobi 40V battery problems and how to fix them.
Ryobi 40V Battery Diagnosis Wizard
Use our specially built wizard below to quickly diagnose your 40v battery problem. Continue reading the article for more in depth information.
Ryobi 40V Battery Wizard
Let’s find out why your battery isn’t charging. We’ll start with some essential pre-checks.
Essential Safety Warning
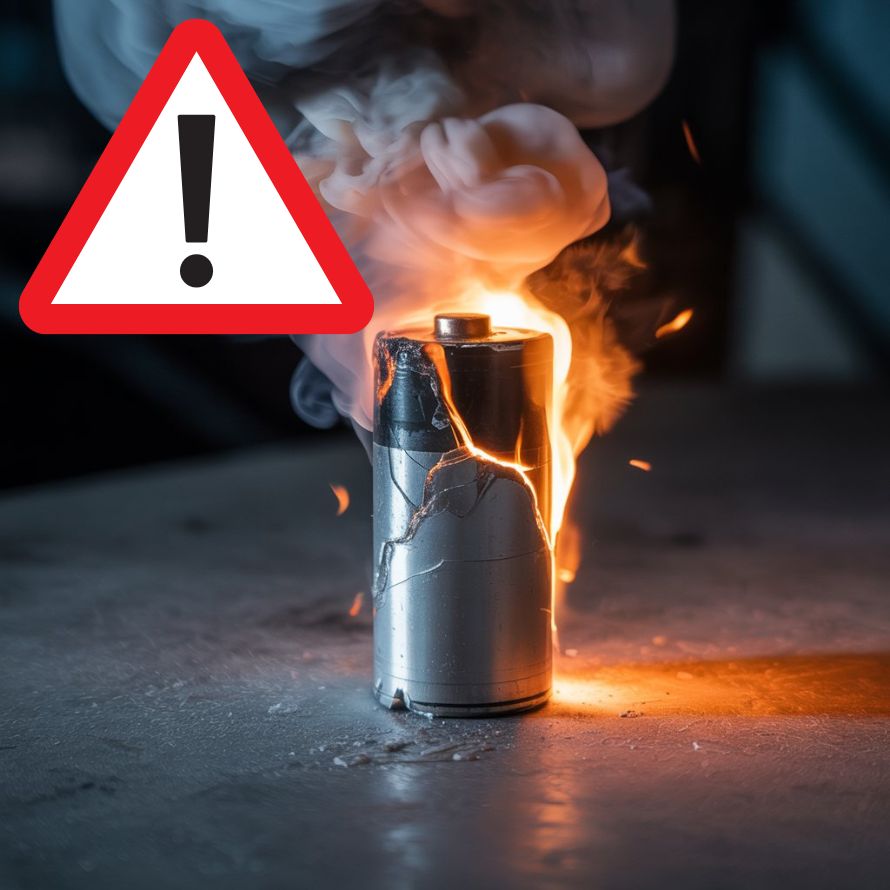
Li-ion batteries store massive energy and can trigger thermal runaway—a deadly chain reaction causing fires, toxic gases, and explosions.
Never attempt repairs if you see swelling, hear hissing, smell chemicals, feel excessive heat, or see smoke.
Critical triggers: Physical damage, short circuits, overcharging, extreme heat.
Required safety gear:
- Safety goggles
- chemical-resistant gloves
- well-ventilated workspace
- Class ABC/D fire extinguisher
- dry sand nearby.
Never use water on Li-ion fires.
If you can’t meet these conditions, buy a new battery instead.
Foundational Diagnostics: Is It the Battery, the Charger, or Something Else?
Before assuming a complicated internal fault, a careful check over can often identify a simpler issue. Many charging problems are caused by the charger, dirty contacts, or temperature…
Not the battery itself.
1. Systematic Charger and Terminal Inspection
The physical connection between the battery and charger is a common failure point.
- Inspect the Contacts: Examine the metal contact blades on both the battery and the charger. They should be clean, straight, and free of damage or corrosion.
- Cleaning Procedure: If the terminals are dirty, use a cotton swab lightly dampened with high-purity (>90%) isopropyl alcohol to wipe them clean. For light corrosion, you can gently use a small piece of fine-grit sandpaper (600 grit or higher) or a fiberglass scratch pen on the contacts, followed by another wipe with alcohol to remove any debris.
2. Is Your Battery Too Hot of Too Cold?
Li-ion batteries are very sensitive to temperature. The internal Battery Management System (BMS) will prevent charging if the battery is outside its safe operational window, which is generally between 32°F and 113°F (0°C to 45°C).
- Too Cold: Attempting to charge a battery below freezing can cause an irreversible process called “lithium plating,” which permanently reduces capacity and increases risk. If your battery has been in a cold garage, bring it inside and let it acclimate to room temperature for at least one to two hours before charging.
- Too Hot: Charging a battery immediately after heavy use (e.g., mowing the lawn on a summer day) accelerates chemical degradation and shortens its lifespan. Let a hot battery rest in a cool, shaded area for 30 to 60 minutes before placing it on the charger. Do not place a hot battery in a refrigerator or freezer, as this can cause condensation and internal moisture problems.
3. Faulty Ryobi Battery Charger
Testing if the charger itself is faulty can be tricky. Ryobi 40v chargers have sensors that prevent them from outputting voltage unless a battery is detected, so you can’t simply test the output with a multimeter.
First, try a simple power cycle. Unplug the charger from the wall, wait a full minute, and plug it back in. This can sometimes resolve temporary electronic glitches.
If that doesn’t work, the best way to test the charger is with a second battery or a second charger.
- Use Another Battery: Try charging a known-healthy 40V Ryobi battery. If it fails to charge and gives the same error, your charger is likely the problem. If the second battery charges correctly, your charger is fine, and the original battery is the issue.
- Try Another Charger: Plug your battery into a known-working Ryobi charger. If it still fails to charge, your battery is confirmed to be faulty. If it charges up properly, your original charger is the problem.
- New Slim Line design provides quick charge technology in a portable form factor
- Compatible with all Ryobi 40v batteries with battery protection technology for safe charging
- Status Indicator Monitors Battery During Charging
- OP401 2-Port replacement ryobi 40V lithium battery charger
- Fully compatible with All Ryobi 40-Volt lithium-ion battery models
- The charger 2Ports are able to charge 2 Ryobi 40V batteries at the same time,
- Diagnosticer with LED indicator continuously communicates battery charge statu
- CE, FCC, RoHS certified
- Includes the Ryobi 40 Volt 4.0 battery and the slim charger
- Both the Battery and charger is compatible with all other pre existing Ryobi 40V equipment
- On-board LED battery life indicator
- Lithium-ion cells deliver fade-free performance
- High capacity OP40404 4.0 Ah battery for extended run time
Understanding the Ryobi Charger Light Codes
The LED lights on your charger are your primary diagnostic tool.
The “Testing” mode is especially important, it is not an error. It means the charger is actively conditioning a battery that is too hot, too cold, or too deeply discharged.
Be patient and allow the charger time to complete this process.
| Red LED Status | Green LED Status | Orange LED Status | Charger Diagnosis | Detailed Explanation | Recommended User Action |
| ON | OFF | OFF | Power On / Standby | The charger is plugged into an AC outlet and is ready. No battery is inserted. | Insert a 40V battery to begin charging. |
| OFF | Flashing | OFF | Charging | The charger is in the primary charging phase. This is normal operation. | Allow the battery to charge until the green light becomes solid. |
| OFF | SOLID | OFF | Charging Complete | The battery is fully charged and in maintenance mode. | Remove the battery from the charger for use or storage. |
| Flashing | Flashing | OFF | Defective Battery | The charger has detected a critical fault like a short circuit or severe cell imbalance. | Attempt deep discharge recovery methods below. If unsuccessful, the battery may be permanently failed. |
| OFF | OFF | Flashing/Solid | Testing – Hot Battery | The battery’s temperature is above the safe charging limit (approx. 113°F). | Remove the battery. Let it rest in a cool, shaded area for 30-60 minutes before retrying. |
| OFF | OFF | Flashing/Solid | Testing – Cold Battery | The battery’s temperature is below the safe charging limit (approx. 32°F). | Remove the battery. Bring it indoors to warm to room temperature for 1-2 hours before retrying. |
| OFF | OFF | Flashing/Solid | Testing – Deeply Discharged | The battery’s voltage is too low for normal charging. The charger is trying to revive it. | Leave the battery on the charger. If it doesn’t switch to “Charging” (flashing green) after 30-60 minutes, proceed to manual recovery. |
Ryobi a “Sleeping” Battery: Deep Discharge Recovery

The most common reason for the flashing red and green lights is a battery in “sleep mode.” This happens when a battery is over-discharged, and its voltage drops so low that the charger’s safety circuits refuse to recognize it. Our goal is to manually raise the battery’s voltage just enough for the charger to accept it again.
Method 1: The Patience Method (Micro-Charging)
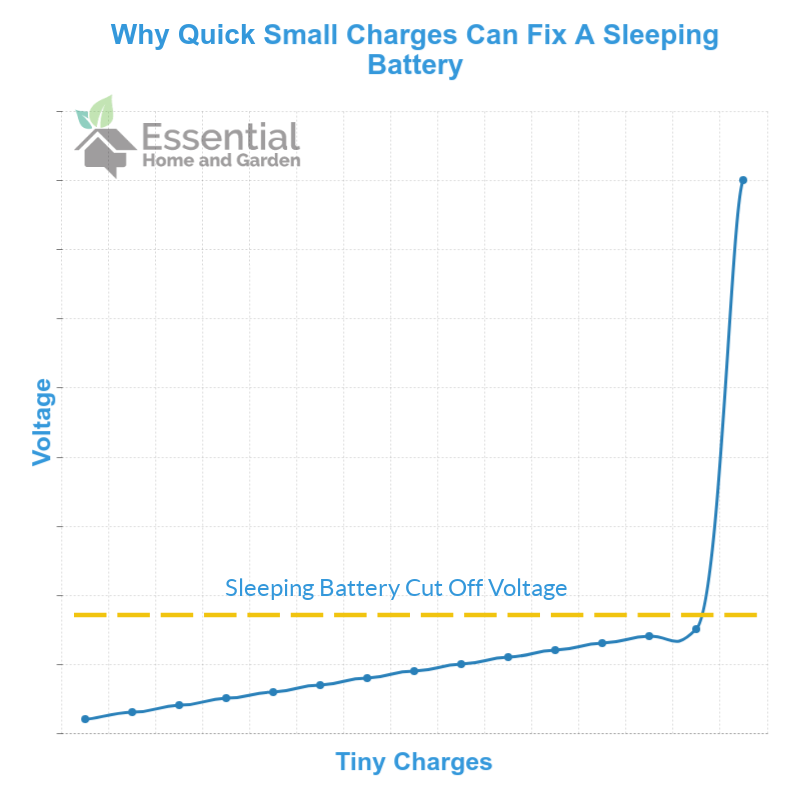
This is the safest and simplest method, but it requires patience.
- Plug your charger into a power outlet.
- Insert the sleeping battery into the charger just long enough for the indicator light to appear (1-2 seconds).
- Immediately remove the battery before the red and green lights begin to flash.
- Wait a few seconds, and then repeat the process.
- Continue this cycle for up to 30 minutes. Each time, the charger delivers a tiny pre-charge current, slowly “walking” the battery’s voltage up until the charger recognizes it and begins a normal charge cycle.
Also Read: Ryobi Pressure Washer Troubleshooting
Method 2: The Peer Jump-Start
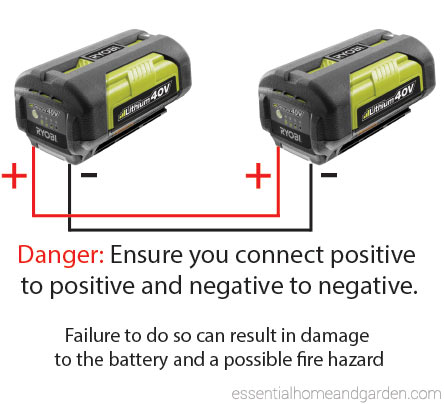
This method uses a healthy, charged Ryobi 40V battery to jump-start the sleeping one. It is faster but carries more risk if done incorrectly.
- You will need a healthy, fully charged Ryobi 40V battery and some insulated wire (speaker wire with insulated alligator clips is recommended).
- Identify the positive (+) and negative (-) terminals on both batteries.
- CRITICAL STEP: Connect the positive (+) terminal of the healthy battery to the positive (+) terminal of the sleeping battery.
- CRITICAL STEP: Connect the negative (-) terminal of the healthy battery to the negative (-) terminal of the sleeping battery.
- DOUBLE-CHECK POLARITY. Reversing this connection will cause a dangerous short circuit.
- Leave the batteries connected for 10-15 minutes.
- Disconnect the wires and immediately place the revived battery on its charger.
Warning: Experts advise against boosting Li-ion batteries that have been deeply discharged for a long time (a week or more). Microscopic structures called dendrites can form inside, creating a latent short-circuit risk when current is reintroduced.
Use a DC Power Supply To Jump Start Your 40V Battery
This is the most precise and safest manual method, but it requires a lab-style variable DC power supply.
You will need:
- A DC power supply capable of outputting 40 volts DC
- Some wire – standard speaker wire or similar will do the job
- Set the power supply’s output voltage to 40V.
- CRITICAL SAFETY STEP: Set the power supply’s current limit to a very low value, like 200mA to 500mA (0.2A to 0.5A). This prevents a dangerous rush of current into the battery.
- With the power supply on, connect its leads to the battery terminals, ensuring correct polarity.
- Monitor the voltage on the power supply’s display as it slowly climbs.
- Once the battery voltage reaches about 34V to 36V, disconnect the power supply and place the battery on its standard Ryobi charger.
This method is essentially the same as using a second battery, but instead we use a DC power supply set at the same output voltage (40v)
Advanced Internal Repair (When External Fixes Fail)
If the above methods fail, the problem is likely internal. This process carries significantly higher risks, and the safety protocols outlined at the beginning of this article must be followed strictly.
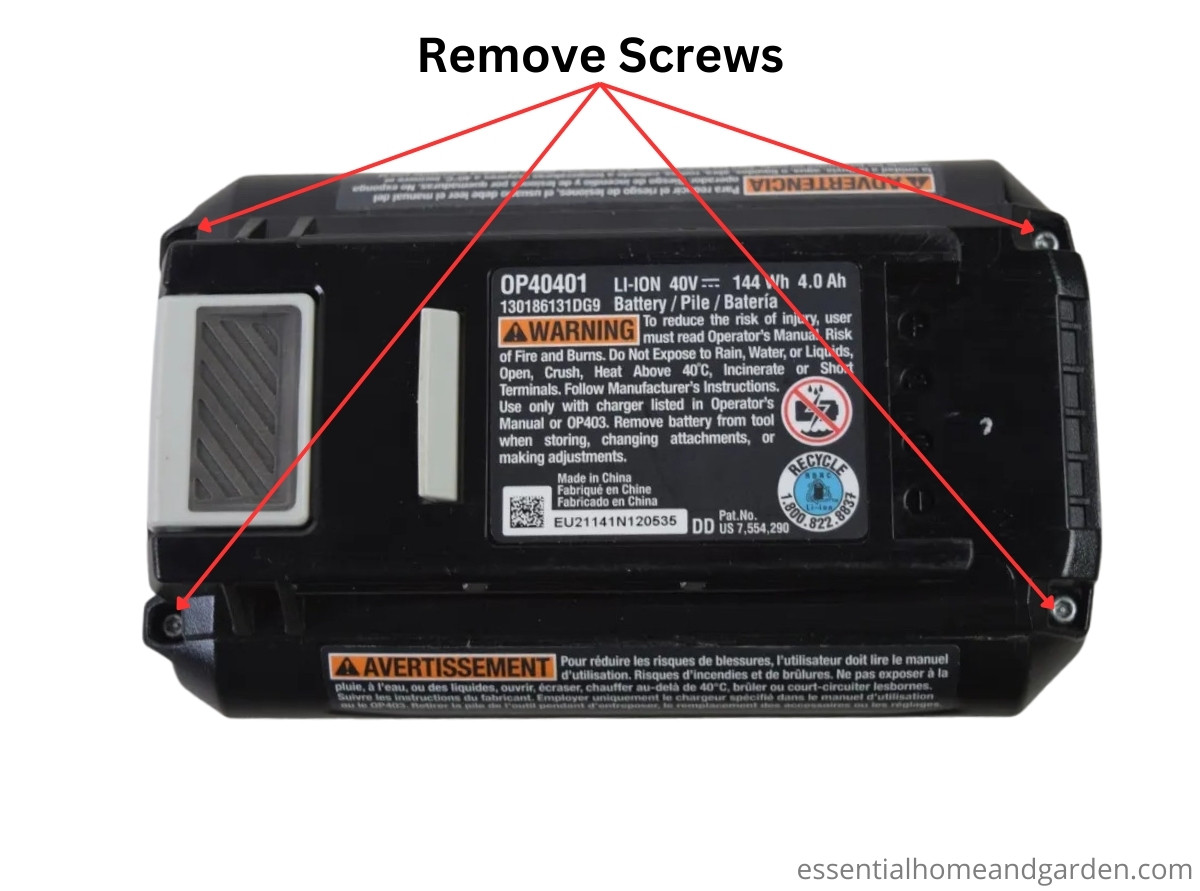
Disassembly and BMS Reset
You will need a Torx Security screwdriver (size TR10 or T10H) and plastic pry tools.
- Remove the four (or more) Torx screws holding the case together. You may need to cut the Ryobi sticker along the seam of the case.
- Gently use plastic pry tools to separate the case halves, releasing the internal clips.
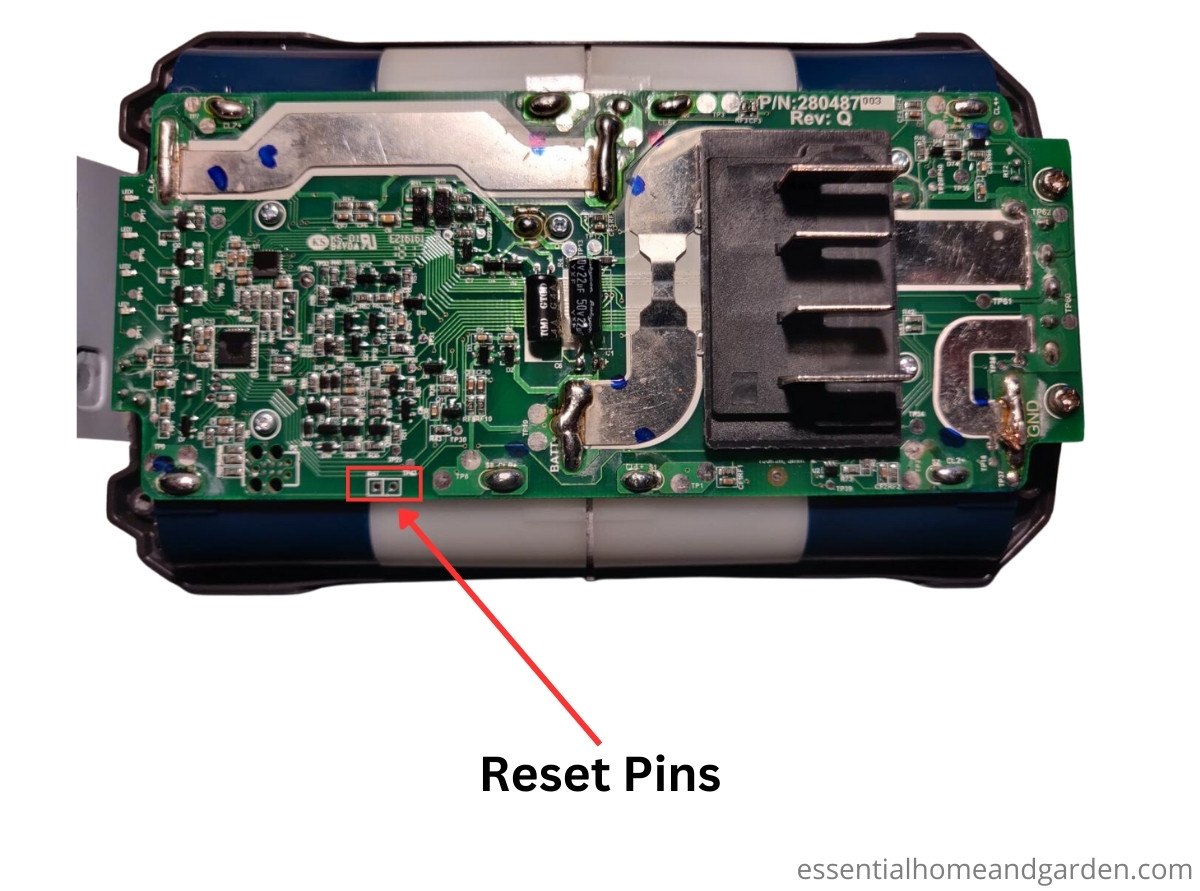
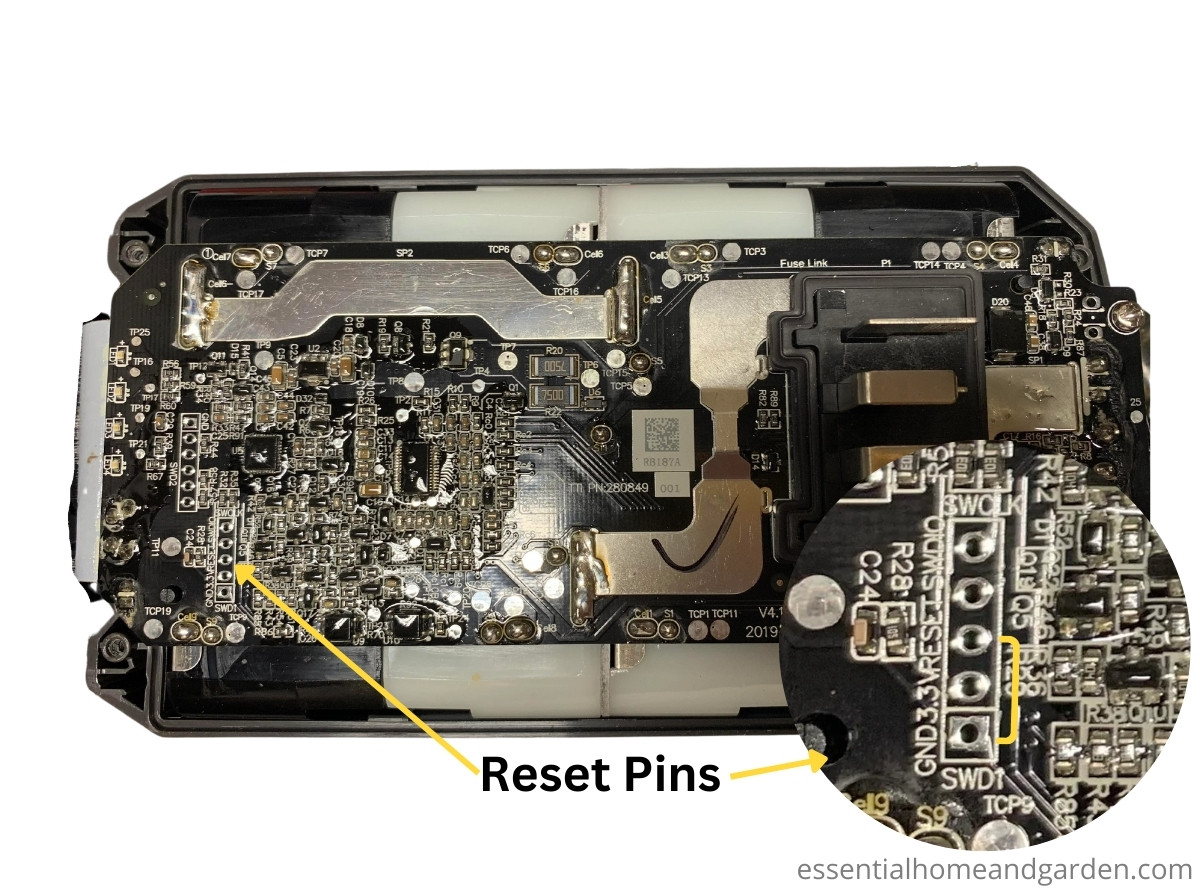
- Once open, you will see the battery cells and the “brain” of the battery—the Battery Management System (BMS) circuit board.
- Sometimes, the BMS can be reset by momentarily shorting two specific pins on the circuit board with a small piece of insulated wire. This can clear a “soft fault.” The correct pins vary by model.
| Battery Model Number | Reset Pins to Short | Notes / Location Description |
| OP40501, OP40401 | RST and GND | The pins are clearly labeled. RST is a single pin, and GND is a nearby ground pad. |
| OP40602 | RESET and GND | The pins are located on a header on the board and are labeled. |
| OP40404 | RES and GND | The reset pin is labeled RES. It should be shorted to a nearby ground (GND) pad. |

A Critical Warning: The “Un-resettable” Modern Battery
A major change in newer Ryobi batteries (roughly post-2021 models) has rendered the simple reset procedure obsolete.
When these more sophisticated BMS units detect a severe fault, they can log a permanent fault. To prevent unsafe repairs, the BMS locks itself down and may be programmed to deliberately drain the entire pack to zero volts, making revival impossible.
If you have a newer battery and the reset procedure fails, it has likely entered this permanent, unfixable state by design. Further attempts are unfortunately not possible.
Is The Battery Too Old?
Unfortunately, it could simply be that your Ryobi tool’s 40-volt lithium-ion battery is simply getting old.
Typically, a Ryobi battery or any 40-volt lithium-ion battery maintains its performance for two to three years, or approximately 300 to 500 charge cycles.
One charge cycle describes the timeline between completely charging the battery, utilizing it until it’s fully discharged, and then charging it up once more.
Once your Ryobi 40-volt battery reaches its third or fourth year, you may begin noticing performance issues.
This could mean the battery’s inability to retain enough charge or, in more serious cases, it might fail to recharge entirely. Should you encounter this situation, replacing the old battery pack with a new one is recommended.
You can purchase a new battery here.
- Works with all RYOBI 40-Volt lithium-ion tools and chargers
- 40-Volt 5.0 Ah high capacity battery for extended run time
- Fade-free lithium-ion power
- Onboard battery life indicator
- Model OP4050A

- Works with all RYOBI 40-Volt lithium-ion tools and chargers
- 40-Volt 6.0 Ah high capacity battery for extended run time
- Fade-free lithium-ion power
- Onboard battery life indicator
- Model OP4060A
![[2Pack] 40 Volt Battery for RYOBI 40V Power Tools - Generic](https://m.media-amazon.com/images/I/41SHRdnuqXL._SL500_.jpg)
- Real Capacity: 6.0Ah/ 6000mAh
- Replacement for for man Ryobi 40 Volt Battery models
- Works with all for RYOBI 40-Volt lithium-ion tools
- Easy to Install & Fast Charge & Long-lasting
- 30 days money back guarantee and 1 year warranty
Proactive Care: How to Maximize Ryobi Battery Lifespan
The best way to fix a battery problem is to prevent it from happening in the first place.
- Implement a Cool-Down Period: One of the most damaging practices is to take a hot battery from a tool and place it directly on the charger. Always let it cool in the shade for at least 30-60 minutes first.
- Avoid Deep Discharges: Constantly running your battery until the tool dies puts maximum strain on the cell chemistry. It’s far better to swap to a fresh battery when you notice a drop in power or the gauge hits one bar.
- Smart Storage is Key (The 40% Rule): For any storage period longer than a few weeks (like over winter), store the battery at a 30% to 50% charge level. This usually corresponds to two lit bars on the fuel gauge. Storing a battery at 100% (especially in the heat) causes rapid capacity loss, while storing it at 0% risks it entering the problematic “sleep mode.”
- Climate Control: Store batteries in a cool, dry place, ideally between 50°F and 77°F (10°C and 25°C). Avoid unheated garages in winter and hot sheds in summer.
- Remove When Fully Charged: While chargers have protections, it’s best practice to remove the battery once it’s full to avoid minor heat buildup and stress on the cells.
Buying a Replacement 40V Battery
When a battery is truly beyond repair, you’ll need a new one.
- The Aftermarket Gamble: The low prices of third-party batteries on sites like Amazon can be tempting, but it’s a market filled with risk. Many use low-grade cells that can’t handle the power demands of a tool, have fake capacity ratings, and may lack critical safety features, creating a serious fire risk. It is strongly recommended to buy genuine OEM Ryobi batteries or those from highly reputable aftermarket brands.
- Market Comparison:
- Ryobi: Offers the best versatility with over 85 tools in the 40V line, making it ideal for homeowners who want one battery system for everything.
- DeWalt: A professional-grade brand built for job site durability. Their FlexVolt batteries are backward-compatible with their 20V MAX tools, offering great value for existing DeWalt users.
- EGO: A specialist in high-performance outdoor power equipment. Often the leader in power and runtime for lawn tools, but their system isn’t as broad as Ryobi’s.
You can purchase genuine Ryobi batteries and chargers from online retailers like Amazon or locally at Ryobi dealers.
Frequently Asked Questions
Can a Ryobi cordless tool battery be repaired?
Yes, you can repair a Ryobi cordless battery. But, it might take too much time and effort.
Opening up the batteries can be difficult; depending on what part is faulty, it may be quite expensive to fix.
Remember that batteries can be dangerous, so it’s best to get a qualified technician to check the battery for you.
Is it OK to leave a Ryobi Lithium-Ion Battery On The Charger?
No, you should charge the battery after use until it is full, then remove it from the charger and store it in an area that doesn’t get too hot or cold.
The ideal battery storage temperature is around 59℉, but standard room temperature is usually fine.
Option 3 worked for me!
Hi! A few weeks ago I purchased a Ryobi 40V HP 21″ Mower (with a 7.5Ah OP40752 Battery and a Rapid OP406 Charger). Once my battery is fully charged, the Charger starts flashing its red and green lights. Since I also purchased a 40V HP Trimmer (with a 4.0Ah OP40404 Battery and another Rapid OP406 Charger) and once my 4.0Ah Battery is fully charged, its charger shows the desired solid green light. I decided to use my two batteries until they were uncharged (both behaved perfectly), and swaped the Rapid Chargers … same result, the 7.5Ah Battery still gets the dreaded red and green flashing lights once fully charged, and the 4.0Ah Battery gets the desired Solid green light on the “swaped” charger. Both my Batteries seem to properly charge (I can see the solid 4 green bars, and the tools work fine for the desired time). Chargers seem ok. Is my 7.5Ah Battery somewhat defective? I love both these powerful devices, but wouldn’t want the 3 yr warranty to expire on my Battery without getting this problem resolved. Thanks for sharing your experience!
YEah it seems like you have a faulty battery – contact Ryobi!
Hey Aaron!
I have a 5ah 40 volt ryobi battery that shows to be fully charged(all 4 lights light up and stay steady) but when I try it on a tool nothing happens. I have also tried re-installing on 3 different chargers and it goes to the dreaded red and green flash. Any suggestions?
Sounds like a dead battery, sorry!
Yes! So glad I found this before I tossed the battery out. Option 3 worked after about 5 quick times. Thanks so much!
I just did the same thing to a 40v Ryobi battery. Aaron said it might take up to 30 minutes. Set an alarm for 10 minutes & got to work. 1st 10 minutes – no results; 2nd set of 10 minutes – started charging just before the alarm went off. Hooray!!!
You were right. It took a lot of patience (a good 15 minutes), but worth the time inserting and removing the 40 volt battery. Finally the green charging light stayed on and battery is charging. Will comment on the end result. Thanks a bunch!
I’ve just encountered the Red/green light flashing for my 36V 5Ah battery and am balking at the fact
that these cost more than the appliance to replace. It has 2 “charge light dot” visible when looking at the charge of the battery, but only one “charge light dot” when in the appliance (lawnmower in this case.)
Voltage measured between +ve and -ve terminals :33.9V
Voltage measured between +ve and T1 :32.6
I’m going to try your recovery method (they’re Li ion, so the procedure should be the same) but I was
wondering if you know if the 36V tools will support a 40V battery.
Will keep you posted if the “wakeup” process worked.
Option 3 worked for me. Battery had 12.5V. A reasonable shown voltage can be a over-discharge battery. I put the battery on and off the charge about 20 times. The green light starting flashing constantly and continued to fully charge. The battery works as expected.
I have a issue with one of my 40 volt Ryobi Batteries. It shows as fully charged but when it’s used in only runs the tools for a few minutes and then quits. If you wait about a minute it will start working again. Still showing full charge. It does this over and over. Any suggestions?
Is the battery getting hot? Sounds very similar to an overheating problem.
I have similar problems with a few 40v batteries I own. They charge fine and if I used the on a low draw system they work fine, but as soon as I put one in my lawn mower or weed whacker they run for a few minutes… stop… then a minute or two later then start up again.
Not an overheating problem as the batteries do not get hot.. seems like a current issue.
Do you have another battery to try in the tool? It might be the tool. My 40v weed whacker does that when using the edger if it gets overtaxed. My guess is that there is something wrong with the tool.
Exactly my problem. It is as if a safety switch in the battery turns off when heavy physical resistance is applied. I have this problem on a 14 inch chain saw. Also, I mounted a 40 volt Ryobe battery on my bicycle. It runs a few seconds and shuts down.
I have had two of my batteries get stuck in my lawn mower over the last two weeks, and I think it’s a common problem that I’ve seen other people in the comments mention.
Upon further inspection what I’ve discovered is that the plastic fins near the terminals of the battery have been warped, as if the battery overheated while in use. They still hold a charge, but they are now incredibly hard to get into and out of any of my tools or chargers.
Try a small file to make those fins smaller. It will take some patience. good luck.
My 40 volt lawnmower is cutting out with a battery level over half. It is warm outside, but is it a possibility I need a new battery
It could indeed be a faulty battery
I had a similar issue. Are you using the bag? The reason I ask is because I discovered the bag, when full, jumped out of the connection slot every time I turned the mower around. Took a while to figure it out but flat I discovered it.
They all flash at the same time four times.
Also the battery is nos accepting any charge.
When you put it on the charger the red and green light flashes on the charger.
I bought a Ryobi OP4026 40v battery, charger, and a couple of weed eaters at a yard sale. I planned on using the motors and battery for some robotics projects. The battery was dead when I got it so I put it on charge. It charged all the way up before giving me the red/green flashing lights. I put the battery in the weed eater and nothing happened. So I hooked one of the motors directly to the battery leads, nothing again. I hooked a multimeter to the battery leads and the voltage slowly drops as the battery slowly drains itself. Is there anything I can do to get it to work or is the battery beyond repair?
Replace the FET on the heatsink. I only get 21 Volts at the output. The main board has 42 volts. Put it apart and charge each bank with 4.1 Volts. Remember polarity of batteries as lithium ion will blow up if reverse charged. Don’t do this if not comfortable with electronic. I take no responsibility for take risks with lithium batteries . Stay safe.
Dear, in France it is called 36V (instead of 40V) but I suppose it is same. Charger using 230VAC for Fast or Slow speed (depend on model). I want to charge my battery using an inverter and small solar panel. Also I need to reduce that charging power (currently 80W – even 300W on fast charger not to modify). 40W should be perfect even if that take more time to fill. I think it is easy to modify inside charger (a resistance value or something else), to reduce output power. Did you already experience this or are you interested in if I find ?
Best regards.
I havent tried this. But would certainly be interested in hearing about your results if you try it.
I purchased the generic battery and the mower will run fine for about 30 seconds and then it shuts off. I release the bar, push the start button and it starts up again. Each time I get 30 seconds before it shuts off. Did this for about 30 minutes while cutting the lawn several times. Battery shows levels of charging as I would expect. Any thoughts?
John
Hi John, it could be a faulty battery? How does the voltage measure on it?
I had same problem with generic batteries in my Ryobi mower, runs for less than a minute and cuts off. If I pull battery out and put back in it runs for less than a minute again and repeat. Replacement generic battery did same thing. Ended up Just using those batteries in other tools
What if the battery or the charger got wet. But neither were plugged in at the time. I tried drying the battery out in the sun but no luck getting it to charge
Unfortunately, electronics and water don’t mix. You probably need charger.
Aaron,
I’d used the refrigerator option a couple of times in the past to get the temperature in range. This time it did not work. In our home, the highest DC supply I could find was 18V. Hence, I tried your Option 3, pushing the battery into the charger for five green flashes, out, five green flashes, out, and so on. It took about seven minutes of this until…voila! I have a working battery and charger again. Thank you, thank you, thank you.
Thanks for the feedback Neil. Glad it worked!
Not only did option 3 work for me on my 40V Ryobi but it also worked on my 18V milwaukee red lithium! I’m so stoked! The Milwaukee had been dead for at least a year and wouldn’t take charge but now its perfectly fine! Thanks for your help!
Fix option 1 does not show underneath the 40 volt batteries the positive and negative wires hook up. Please explain as I see no terminals.
Hi Lynn,
The terminals may be covered on your battery – but I would not recommend that fix unless you have some knowledge in electronics and batteries.
The battery has 4 green lights and no red lights but the blower doesn’t work? Any ideas?
Maybe your blower contacts are not connecting with the battery. It happened to my sister’s weed eater.
My 40v batteries fuel gauge stopped working a week or so ago. Now a week later when the battery is placed in the charger the light stays solid green and never flashes. When I test the battery in the trimmer it works for 2 to 5 seconds and then dies??? My spare battery functions normally in the trimmer and chars fine. Any suggestions?
Hello,
I have a 40 volt 5 ah Ryobi battery. It just stopped working this week when i was trimming my grass with the trimmer. The trimmer is not defective as I tried a spare battery and the trimmer works. When we try charging the
defective battery it charges normally, the green light flashes green until it is fully charged and all the lights on the battery com on when you press the button on the battery. The voltage on the battery only reads 27volts from the + to the – terminal on the battery. When I took the battery apart and measured on the board from the CL1- soldered connection to the Bat+ terminal connection on the board, I measure 41volts. Seems like it is charged but its not getting to the battery out put terminal. Any ideas?
Are the terminals dirty? Could be a dodgy connection between the board and the terminals aswell..
I have a couple of these batteries that are faulty. when I disassembled them all but one had some blue green corrosion on both the top and bottom of several connection points on the board. You may have the same problem. On the top you can get to it to remove but there are several rather large solder connections that you will have to unsolder in order to get remove the board to get to the bottom of it. If you have access to a Pace solder station or something similar you can get the board removed but otherwise…..?